6.2: El área de un paralelogramo
- Page ID
- 114647

\( \newcommand{\vecs}[1]{\overset { \scriptstyle \rightharpoonup} {\mathbf{#1}} } \)
\( \newcommand{\vecd}[1]{\overset{-\!-\!\rightharpoonup}{\vphantom{a}\smash {#1}}} \)
\( \newcommand{\dsum}{\displaystyle\sum\limits} \)
\( \newcommand{\dint}{\displaystyle\int\limits} \)
\( \newcommand{\dlim}{\displaystyle\lim\limits} \)
\( \newcommand{\id}{\mathrm{id}}\) \( \newcommand{\Span}{\mathrm{span}}\)
( \newcommand{\kernel}{\mathrm{null}\,}\) \( \newcommand{\range}{\mathrm{range}\,}\)
\( \newcommand{\RealPart}{\mathrm{Re}}\) \( \newcommand{\ImaginaryPart}{\mathrm{Im}}\)
\( \newcommand{\Argument}{\mathrm{Arg}}\) \( \newcommand{\norm}[1]{\| #1 \|}\)
\( \newcommand{\inner}[2]{\langle #1, #2 \rangle}\)
\( \newcommand{\Span}{\mathrm{span}}\)
\( \newcommand{\id}{\mathrm{id}}\)
\( \newcommand{\Span}{\mathrm{span}}\)
\( \newcommand{\kernel}{\mathrm{null}\,}\)
\( \newcommand{\range}{\mathrm{range}\,}\)
\( \newcommand{\RealPart}{\mathrm{Re}}\)
\( \newcommand{\ImaginaryPart}{\mathrm{Im}}\)
\( \newcommand{\Argument}{\mathrm{Arg}}\)
\( \newcommand{\norm}[1]{\| #1 \|}\)
\( \newcommand{\inner}[2]{\langle #1, #2 \rangle}\)
\( \newcommand{\Span}{\mathrm{span}}\) \( \newcommand{\AA}{\unicode[.8,0]{x212B}}\)
\( \newcommand{\vectorA}[1]{\vec{#1}} % arrow\)
\( \newcommand{\vectorAt}[1]{\vec{\text{#1}}} % arrow\)
\( \newcommand{\vectorB}[1]{\overset { \scriptstyle \rightharpoonup} {\mathbf{#1}} } \)
\( \newcommand{\vectorC}[1]{\textbf{#1}} \)
\( \newcommand{\vectorD}[1]{\overrightarrow{#1}} \)
\( \newcommand{\vectorDt}[1]{\overrightarrow{\text{#1}}} \)
\( \newcommand{\vectE}[1]{\overset{-\!-\!\rightharpoonup}{\vphantom{a}\smash{\mathbf {#1}}}} \)
\( \newcommand{\vecs}[1]{\overset { \scriptstyle \rightharpoonup} {\mathbf{#1}} } \)
\(\newcommand{\longvect}{\overrightarrow}\)
\( \newcommand{\vecd}[1]{\overset{-\!-\!\rightharpoonup}{\vphantom{a}\smash {#1}}} \)
\(\newcommand{\ket}[1]{\left| #1 \right>}\)
\(\newcommand{\bra}[1]{\left< #1 \right|}\)
\(\newcommand{\braket}[2]{\left< #1 \vphantom{#2} \right| \left. #2 \vphantom{#1} \right>}\)
\(\newcommand{\braopket}[3]{\left< #1 \vphantom{#2}\vphantom{#3} \right| #2 \vphantom{#1}\vphantom{#3} \left| #3 \vphantom{#1}\vphantom{#2} \right>}\)
\(\newcommand{\qmvec}[1]{\mathbf{\vec{#1}}}\)
\(\newcommand{\op}[1]{\hat{\mathbf{#1}}}\)
\(\newcommand{\expect}[1]{\langle #1 \rangle}\)
\(\newcommand{\dfn}[1]{\emph{\textbf{#1}}}\)
En paralelogramo\(ABCD\) de Figura\(\PageIndex{1}\), lado\(AB\) se llama la base y el segmento de línea\(DE\) se llama la altura o altitud. La base puede ser cualquier lado del paralelogramo, aunque generalmente se elige para ser el lado en el que el paralelogramo parece estar descansando. La altura es una línea dibujada perpendicular a la base desde el lado opuesto.
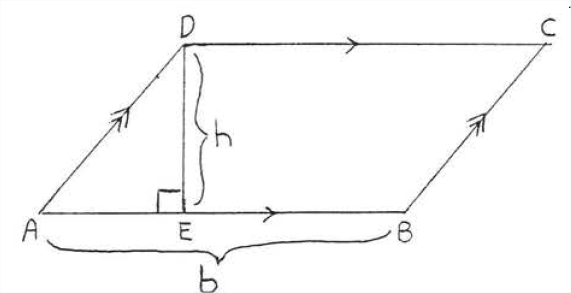
El son de un paralelogramo es igual a su base por su altura.
\[A = bh\]
- Prueba
-
Dibuja\(BF\) y\(CF\) como se muestra en la Figura\(\PageIndex{2}\). \(\angle A=\angle CBF\),\(\angle AED=\angle F=90^{\circ},\) y\(AD=BC\). Por lo tanto\(\triangle ADE \cong \triangle BCF\) y el área de\(\triangle ADE\) es igual al área de\(\triangle BCF\). Contamos con:
\[\begin{array} {rcl} {\text{Area of parallelogram } ABCD} & = & {\text{Area of } \triangle ADE + \text{ Area of trapezoid } BCDE} \\ {} & = & {\text{Area of } \triangle BCF + \text{ Area of trapezoid } BCDE} \\ {} & = & {\text{Area of rectangle } CDEF} \\ {} & = & {bh.} \end{array}\]
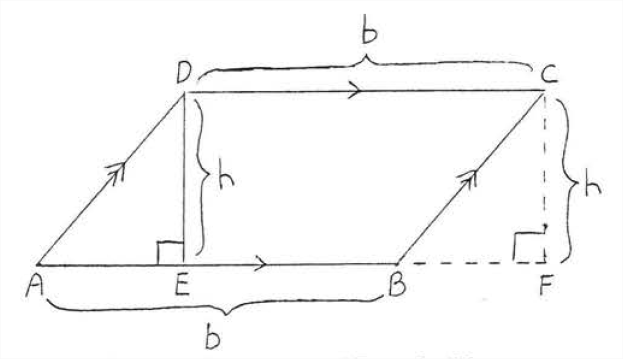
Figura\(\PageIndex{2}\): Dibujar\(BF\) y\(CF\).
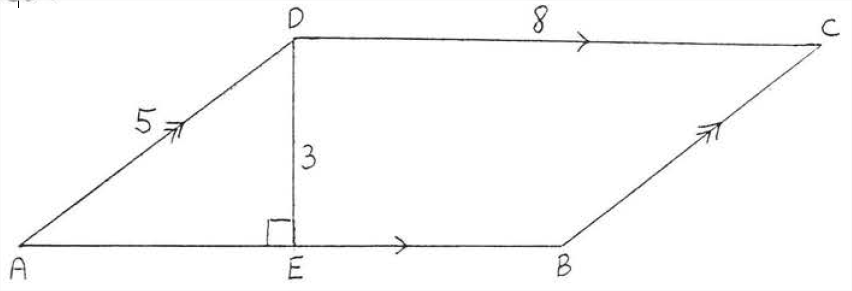
Encuentra el área y perímetro de\(ABCD\):
Solución
\(b = AB = CD = 8\),\(h = 3\). \(\text{Area } = bh = (8)(3) = 24\). \(AB = CD=8\). \(BC = AD =5\). Perímetro = 8 + 8 + 5 + 5 = 26.
Respuesta:
Área = 24, Perímetro = 26.
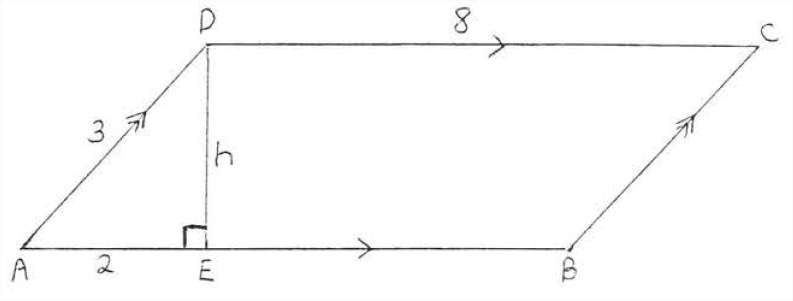
Encuentra el área y perímetro de\(ABCD\):
Solución
Aplica el teorema de Pitágoras al triángulo rectángulo\(ADE\):
\[\begin{array} {rcl} {\text{AE}^2 + \text{DE}^2} & = & {\text{AD}^2} \\ {2^2 + h^2} & = & {3^2} \\ {4 + h^2} & = & {9} \\ {h^2} & = & {5} \\ {h} & = & {\sqrt{5}} \end{array}\]
Área =\(bh = (8)(\sqrt{5}) = 8\sqrt{5}\)
Perímetro\(=8+8+3+3=22\)
Respuesta:\(A = 8 \sqrt{5}, P = 22\).
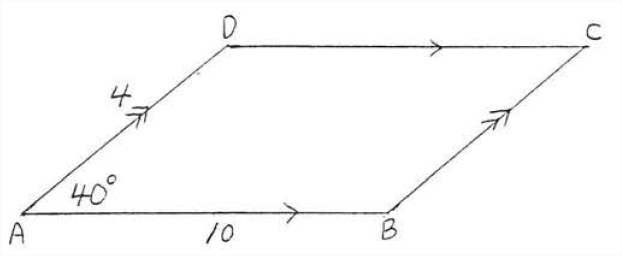
Encuentra el área y perímetro a la décima más cercana
Solución
Para encontrar el área primero debemos encontrar la altura\(h\) (Figura\(\PageIndex{3}\)), Usando trigonometría
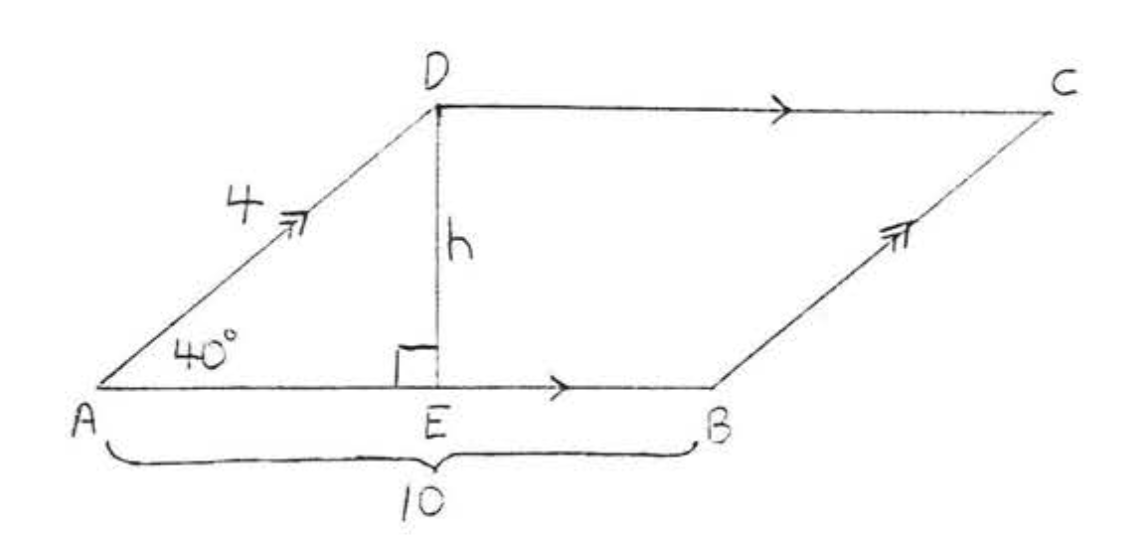
\(\begin{array} {rcl} {\sin 40^{\circ}} & = & {\dfrac{h}{4}} \\ {(4) .6428} & = & {\dfrac{h}{\cancel{4}} (\cancel{4})} \\ {2.5712} & = & {h} \end{array}\)
Área =\(bh = (10)(2.5712) = 25.712 - 25.7\)
Perímetro = 10 + 10 + 4 + 4 = 28.
Contestar
\(A = 25.7\),\(P = 28\).
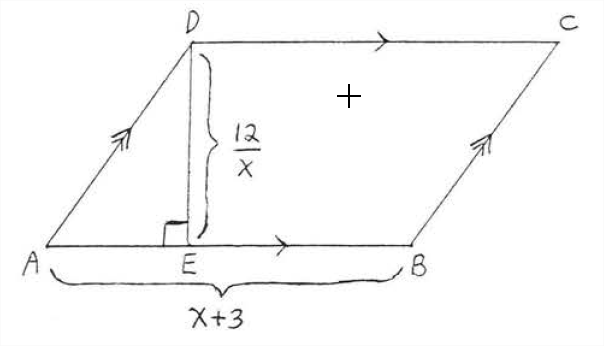
Encuentra\(x\) si el área es 21.
Solución
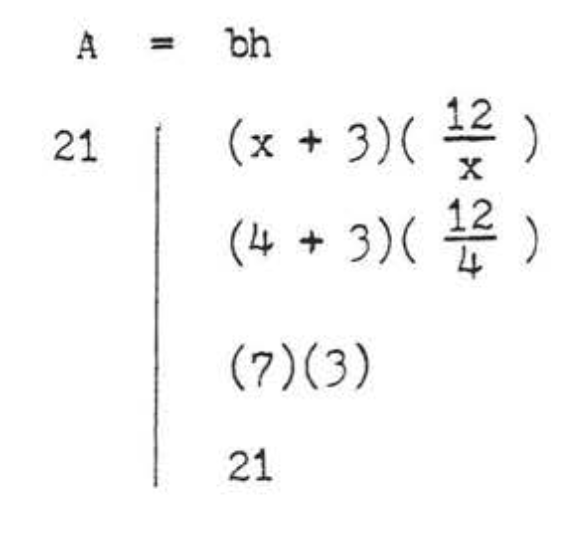
\[\begin{array} {rcl} {A} & = & {bh} \\ {21} & = & {(x + 3)(\dfrac{12}{x})} \\ {(x)21} & = & {(x + 3)(\dfrac{12}{\cancel{x}})(\cancel{x})} \\ {21x} & = & {12x + 36} \\ {9x} & = & {36} \\ {x} & = & {4} \end{array}\]
Comprobar:
Contestar
\(x = 4\).
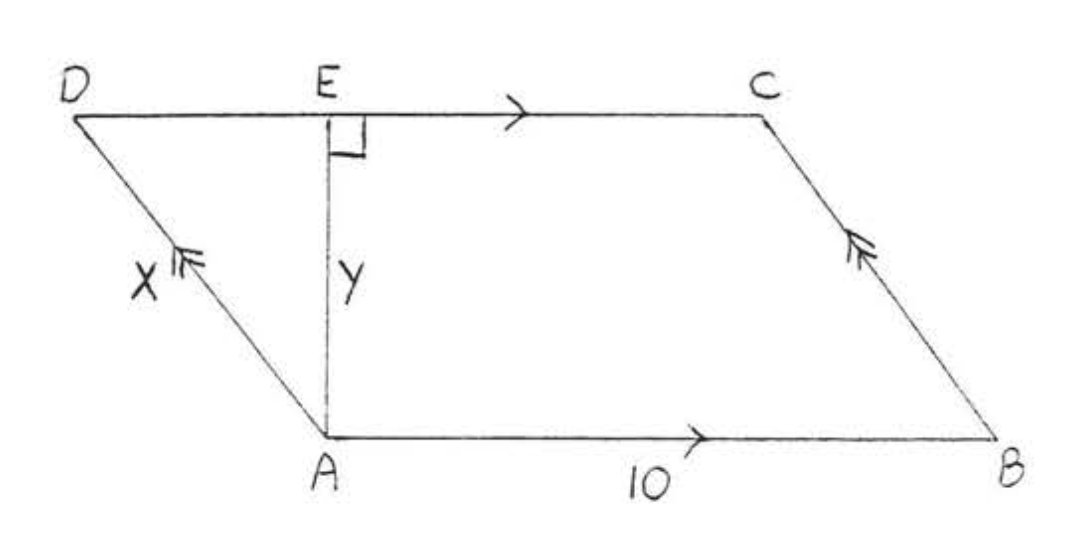
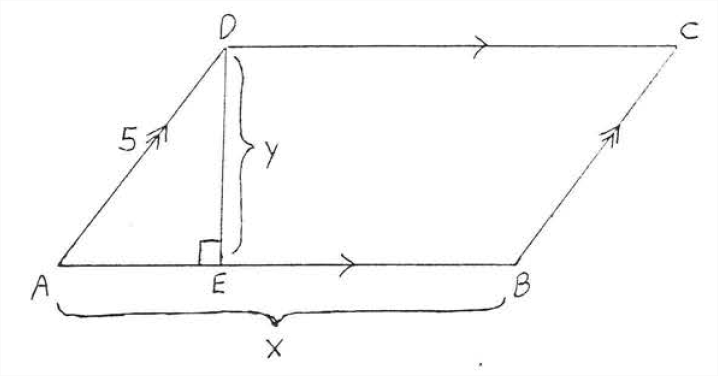
El área de paralelogramo\(ABCD\) es 48 y el perímetro es 34. Encuentra\(x\) y\(y\):
Solución
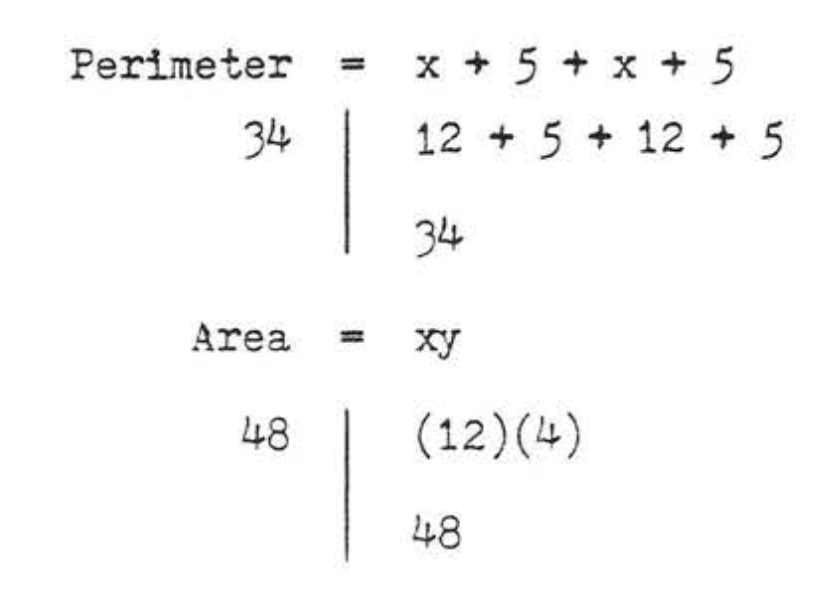
\[\begin{array} {rcl} {\text{Perimeter}} & = & {AB +BC+CD+DA} \\ {34} & = & {x + 5 + x+5} \\ {34} & = & {2x+10} \\ {24} & = & {2x} \\ {12} & = & {x} \\ {\text{Area}} & = & {xy} \\ {48} & = & {12y} \\ {4} & = & {y} \end{array}\]
Comprobar:
Contestar
\(x = 12, y = 4\)
Problemas
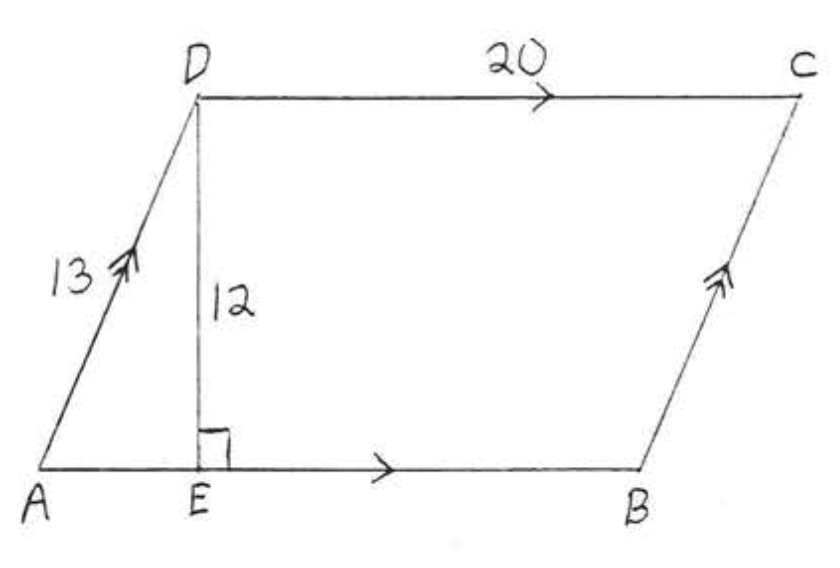
1 - 4. Encuentra el área y perímetro de\(ABCD\)
1.
2.
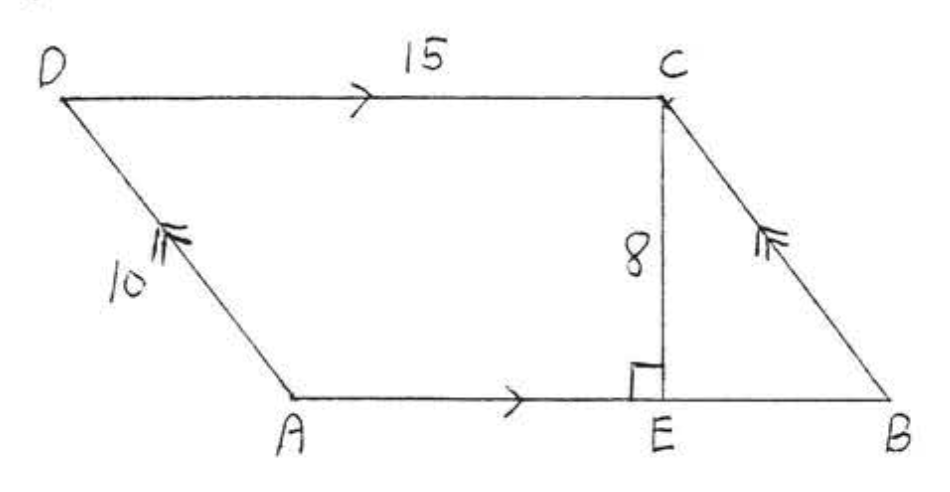
3.
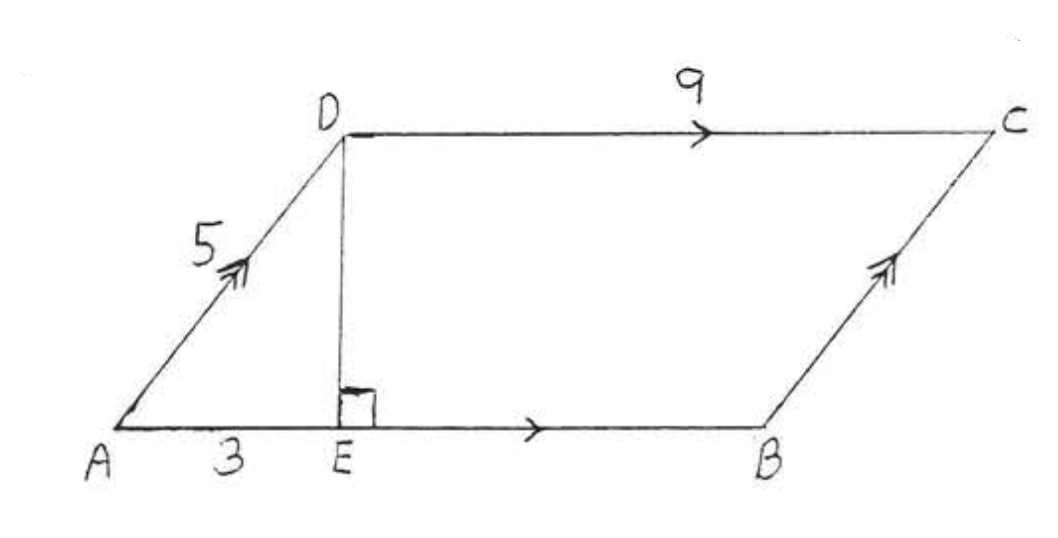
4.
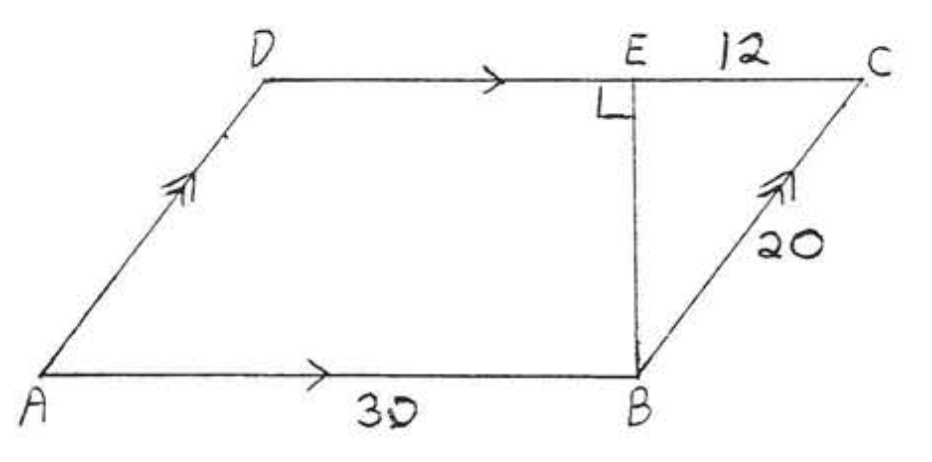
5 - 6. Encuentra el área y perímetro a la décima más cercana:
5.
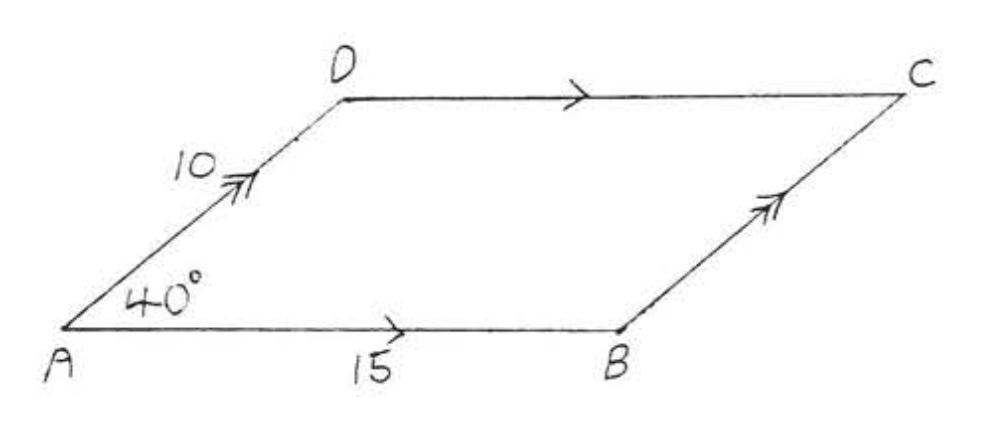
6.
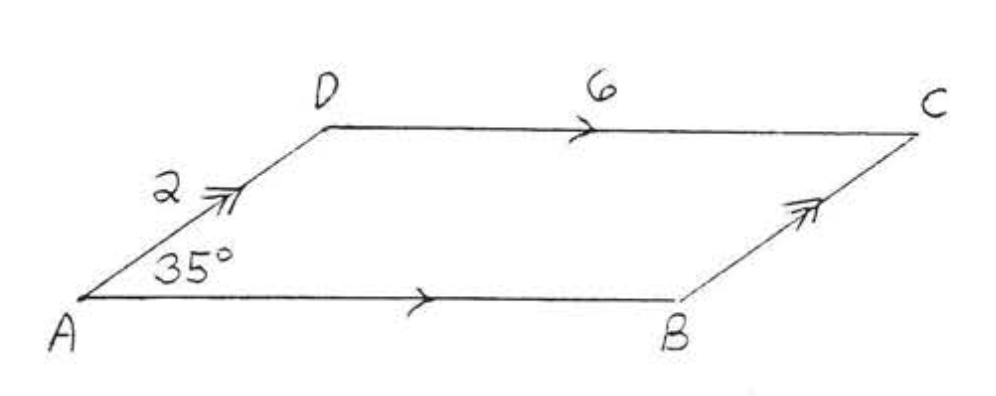
7 - 8. Encuentra el área y perímetro. Deja las respuestas en forma radical más simple:
7.
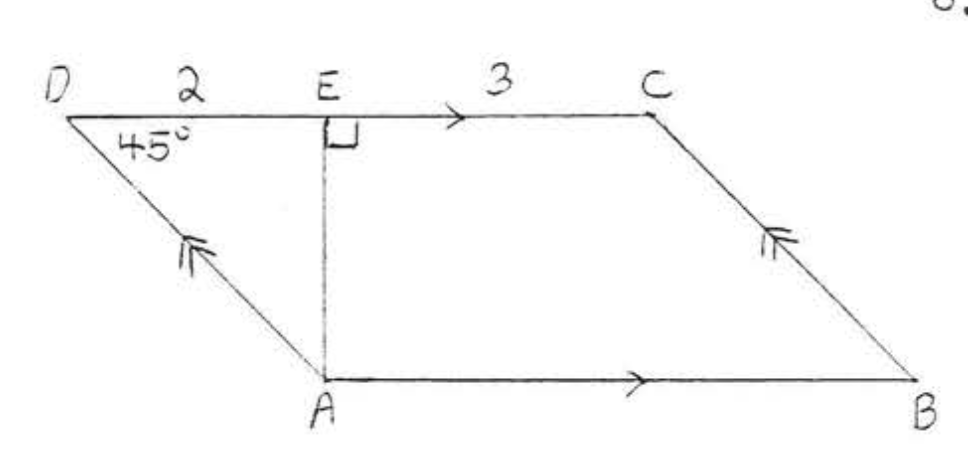
8.
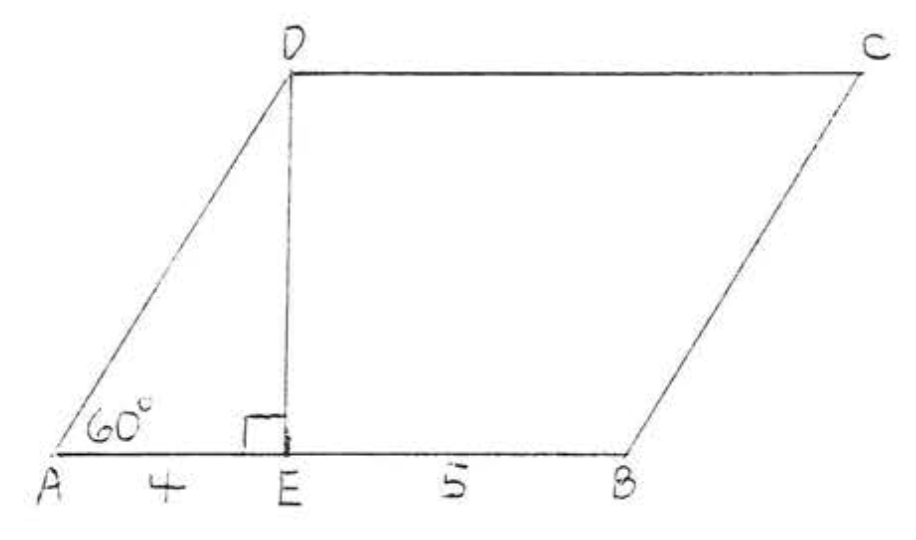
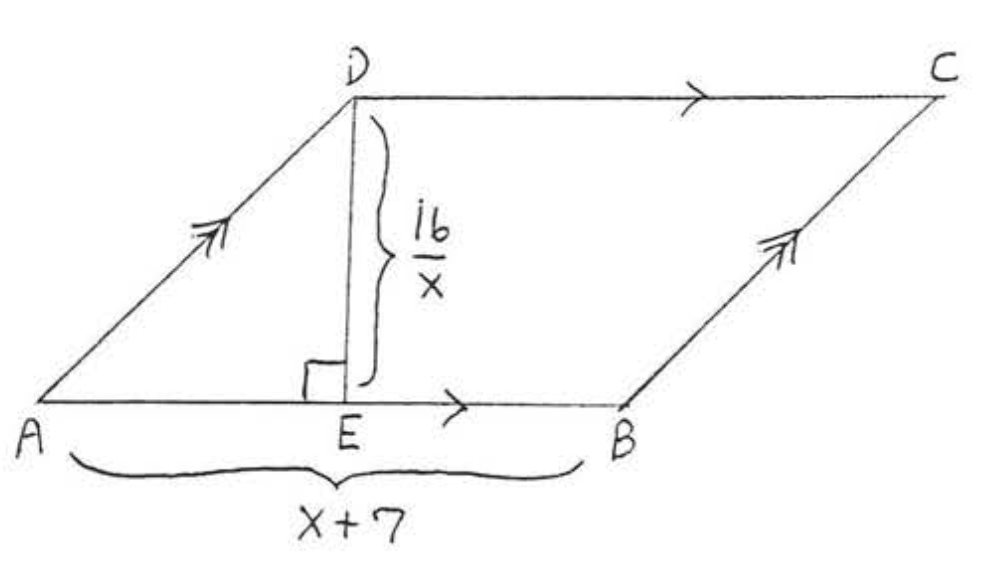
9. Encuentra\(x\) si el área de\(ABCD\) es 36:
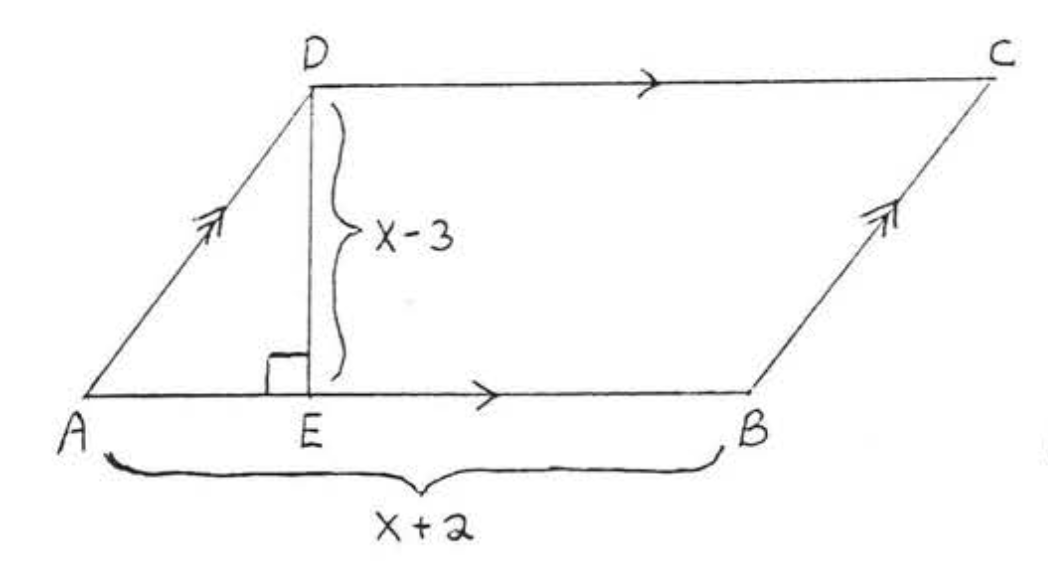
10. Encuentra\(x\) si el área de\(ABCD\) es 72:
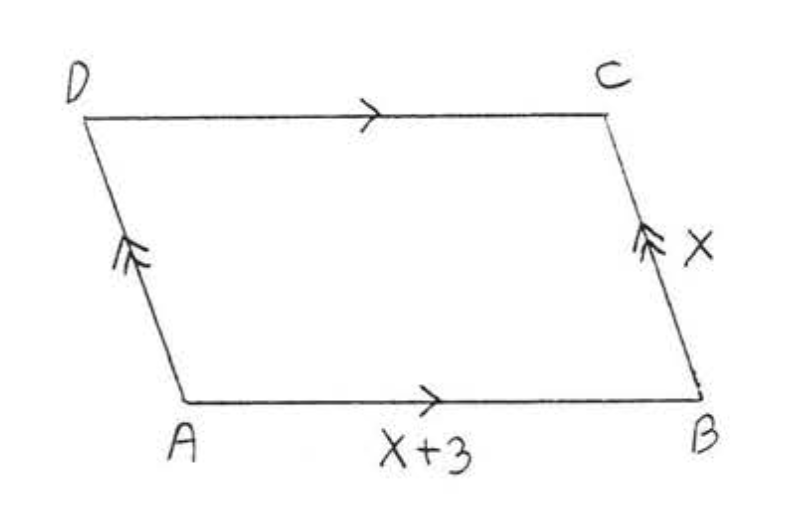
11. Encuentra\(x\) si el perímetro es 22:
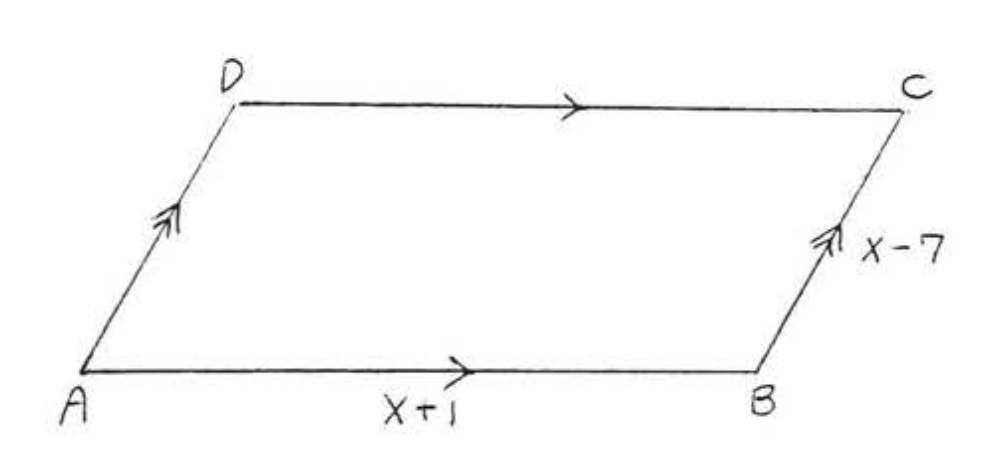
12. Encuentra\(x\) si el perímetro es 40:
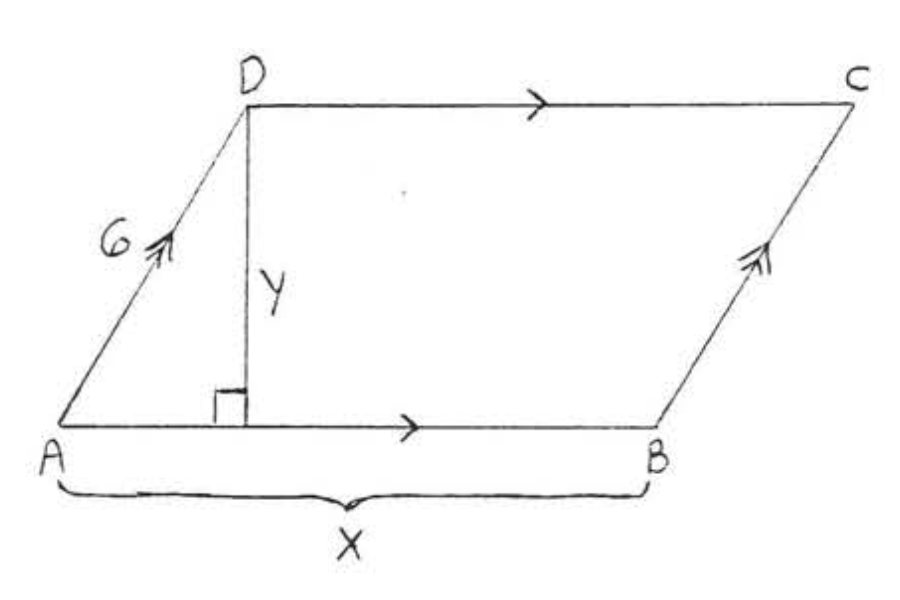
13. El área de\(ABCD\) es 40 y el perímetro es 28. Encuentra\(x\) y\(y\):
14. El área de\(ABCD\) es 40 y el perímetro es 30. Encuentra\(x\) y\(y\):