

12.3: Fórmulas geométricas
- Page ID
- 114298
\( \newcommand{\vecs}[1]{\overset { \scriptstyle \rightharpoonup} {\mathbf{#1}} } \)
\( \newcommand{\vecd}[1]{\overset{-\!-\!\rightharpoonup}{\vphantom{a}\smash {#1}}} \)
\( \newcommand{\dsum}{\displaystyle\sum\limits} \)
\( \newcommand{\dint}{\displaystyle\int\limits} \)
\( \newcommand{\dlim}{\displaystyle\lim\limits} \)
\( \newcommand{\id}{\mathrm{id}}\) \( \newcommand{\Span}{\mathrm{span}}\)
( \newcommand{\kernel}{\mathrm{null}\,}\) \( \newcommand{\range}{\mathrm{range}\,}\)
\( \newcommand{\RealPart}{\mathrm{Re}}\) \( \newcommand{\ImaginaryPart}{\mathrm{Im}}\)
\( \newcommand{\Argument}{\mathrm{Arg}}\) \( \newcommand{\norm}[1]{\| #1 \|}\)
\( \newcommand{\inner}[2]{\langle #1, #2 \rangle}\)
\( \newcommand{\Span}{\mathrm{span}}\)
\( \newcommand{\id}{\mathrm{id}}\)
\( \newcommand{\Span}{\mathrm{span}}\)
\( \newcommand{\kernel}{\mathrm{null}\,}\)
\( \newcommand{\range}{\mathrm{range}\,}\)
\( \newcommand{\RealPart}{\mathrm{Re}}\)
\( \newcommand{\ImaginaryPart}{\mathrm{Im}}\)
\( \newcommand{\Argument}{\mathrm{Arg}}\)
\( \newcommand{\norm}[1]{\| #1 \|}\)
\( \newcommand{\inner}[2]{\langle #1, #2 \rangle}\)
\( \newcommand{\Span}{\mathrm{span}}\) \( \newcommand{\AA}{\unicode[.8,0]{x212B}}\)
\( \newcommand{\vectorA}[1]{\vec{#1}} % arrow\)
\( \newcommand{\vectorAt}[1]{\vec{\text{#1}}} % arrow\)
\( \newcommand{\vectorB}[1]{\overset { \scriptstyle \rightharpoonup} {\mathbf{#1}} } \)
\( \newcommand{\vectorC}[1]{\textbf{#1}} \)
\( \newcommand{\vectorD}[1]{\overrightarrow{#1}} \)
\( \newcommand{\vectorDt}[1]{\overrightarrow{\text{#1}}} \)
\( \newcommand{\vectE}[1]{\overset{-\!-\!\rightharpoonup}{\vphantom{a}\smash{\mathbf {#1}}}} \)
\( \newcommand{\vecs}[1]{\overset { \scriptstyle \rightharpoonup} {\mathbf{#1}} } \)
\(\newcommand{\longvect}{\overrightarrow}\)
\( \newcommand{\vecd}[1]{\overset{-\!-\!\rightharpoonup}{\vphantom{a}\smash {#1}}} \)
\(\newcommand{\ket}[1]{\left| #1 \right>}\)
\(\newcommand{\bra}[1]{\left< #1 \right|}\)
\(\newcommand{\braket}[2]{\left< #1 \vphantom{#2} \right| \left. #2 \vphantom{#1} \right>}\)
\(\newcommand{\braopket}[3]{\left< #1 \vphantom{#2}\vphantom{#3} \right| #2 \vphantom{#1}\vphantom{#3} \left| #3 \vphantom{#1}\vphantom{#2} \right>}\)
\(\newcommand{\qmvec}[1]{\mathbf{\vec{#1}}}\)
\(\newcommand{\op}[1]{\hat{\mathbf{#1}}}\)
\(\newcommand{\expect}[1]{\langle #1 \rangle}\)
\(\newcommand{\dfn}[1]{\emph{\textbf{#1}}}\)
Tabla C1 - 2 Dimensiones
| Nombre | Forma | Fórmulas |
|---|---|---|
| Rectángulo | 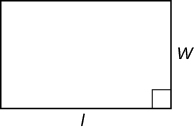 |
Perímetro: P =\(2l + 2w\) Área: A =\(lw\) |
| Cuadrado | 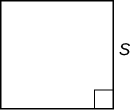 |
Perímetro: P = 4s Área: A = s 2 |
| Triángulo | 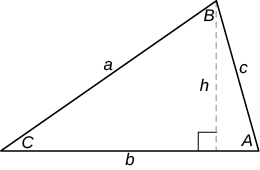 |
Perímetro: P = a + b + c Área: A =\(\dfrac{1}{2}\) bh Suma de ángulos: A + B + C = 180° |
| Triángulo Recto | 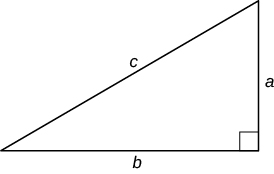 |
Teorema de Pitágoras: a 2 + b 2 = c 2 Área: A =\(\dfrac{1}{2}\) ab |
| Círculo | 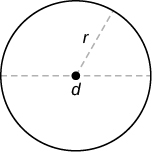 |
Circunferencia: C = 2\(\pi\) r o C =\(\pi\) d Área: A =\(\pi\) r 2 |
| Paralelogramo | 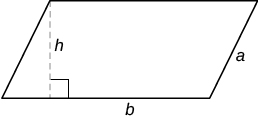 |
Perímetro: P = 2a + 2b Área: A = bh |
| Trapezoide | 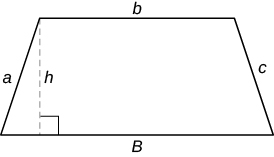 |
Perímetro: P = a + b + c + B Área: A =\(\dfrac{1}{2}\) (B + b) h |
Tabla C2 - 3 Dimensiones
| Nombre | Forma | Fórmulas |
|---|---|---|
| Sólido Rectangular | 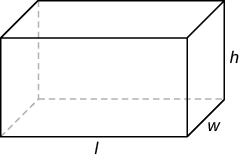 |
Volumen: V =\(lwh\) Superficie: SA =\(2lw + 2wh + 2hl\) |
| Cubo | 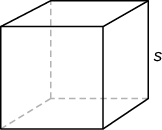 |
Volumen: V = s 3 Superficie: SA = 6s 2 |
| Cono | 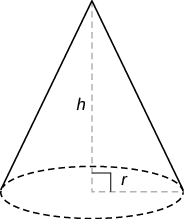 |
Volumen: V =\(\dfrac{1}{3} \pi r^{2} h\) Superficie: SA =\(\pi r^{2} + \pi r \sqrt{h^{2} + r^{2}}\) |
| Esfera | 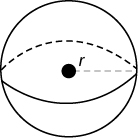 |
Volumen: V =\(\dfrac{4}{3} \pi r^{3}\) Superficie: SA =\(4 \pi r^{2}\) |
| Cilindro Circular Derecho | 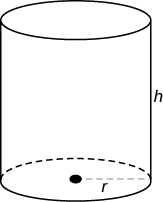 |
Volumen: V =\(\pi r^{2} h\) Superficie: SA =\(2 \pi r^{2} + 2 \pi rh\) |