6.1: Modos de Flash
- Page ID
- 107089
\( \newcommand{\vecs}[1]{\overset { \scriptstyle \rightharpoonup} {\mathbf{#1}} } \)
\( \newcommand{\vecd}[1]{\overset{-\!-\!\rightharpoonup}{\vphantom{a}\smash {#1}}} \)
\( \newcommand{\id}{\mathrm{id}}\) \( \newcommand{\Span}{\mathrm{span}}\)
( \newcommand{\kernel}{\mathrm{null}\,}\) \( \newcommand{\range}{\mathrm{range}\,}\)
\( \newcommand{\RealPart}{\mathrm{Re}}\) \( \newcommand{\ImaginaryPart}{\mathrm{Im}}\)
\( \newcommand{\Argument}{\mathrm{Arg}}\) \( \newcommand{\norm}[1]{\| #1 \|}\)
\( \newcommand{\inner}[2]{\langle #1, #2 \rangle}\)
\( \newcommand{\Span}{\mathrm{span}}\)
\( \newcommand{\id}{\mathrm{id}}\)
\( \newcommand{\Span}{\mathrm{span}}\)
\( \newcommand{\kernel}{\mathrm{null}\,}\)
\( \newcommand{\range}{\mathrm{range}\,}\)
\( \newcommand{\RealPart}{\mathrm{Re}}\)
\( \newcommand{\ImaginaryPart}{\mathrm{Im}}\)
\( \newcommand{\Argument}{\mathrm{Arg}}\)
\( \newcommand{\norm}[1]{\| #1 \|}\)
\( \newcommand{\inner}[2]{\langle #1, #2 \rangle}\)
\( \newcommand{\Span}{\mathrm{span}}\) \( \newcommand{\AA}{\unicode[.8,0]{x212B}}\)
\( \newcommand{\vectorA}[1]{\vec{#1}} % arrow\)
\( \newcommand{\vectorAt}[1]{\vec{\text{#1}}} % arrow\)
\( \newcommand{\vectorB}[1]{\overset { \scriptstyle \rightharpoonup} {\mathbf{#1}} } \)
\( \newcommand{\vectorC}[1]{\textbf{#1}} \)
\( \newcommand{\vectorD}[1]{\overrightarrow{#1}} \)
\( \newcommand{\vectorDt}[1]{\overrightarrow{\text{#1}}} \)
\( \newcommand{\vectE}[1]{\overset{-\!-\!\rightharpoonup}{\vphantom{a}\smash{\mathbf {#1}}}} \)
\( \newcommand{\vecs}[1]{\overset { \scriptstyle \rightharpoonup} {\mathbf{#1}} } \)
\( \newcommand{\vecd}[1]{\overset{-\!-\!\rightharpoonup}{\vphantom{a}\smash {#1}}} \)
\(\newcommand{\avec}{\mathbf a}\) \(\newcommand{\bvec}{\mathbf b}\) \(\newcommand{\cvec}{\mathbf c}\) \(\newcommand{\dvec}{\mathbf d}\) \(\newcommand{\dtil}{\widetilde{\mathbf d}}\) \(\newcommand{\evec}{\mathbf e}\) \(\newcommand{\fvec}{\mathbf f}\) \(\newcommand{\nvec}{\mathbf n}\) \(\newcommand{\pvec}{\mathbf p}\) \(\newcommand{\qvec}{\mathbf q}\) \(\newcommand{\svec}{\mathbf s}\) \(\newcommand{\tvec}{\mathbf t}\) \(\newcommand{\uvec}{\mathbf u}\) \(\newcommand{\vvec}{\mathbf v}\) \(\newcommand{\wvec}{\mathbf w}\) \(\newcommand{\xvec}{\mathbf x}\) \(\newcommand{\yvec}{\mathbf y}\) \(\newcommand{\zvec}{\mathbf z}\) \(\newcommand{\rvec}{\mathbf r}\) \(\newcommand{\mvec}{\mathbf m}\) \(\newcommand{\zerovec}{\mathbf 0}\) \(\newcommand{\onevec}{\mathbf 1}\) \(\newcommand{\real}{\mathbb R}\) \(\newcommand{\twovec}[2]{\left[\begin{array}{r}#1 \\ #2 \end{array}\right]}\) \(\newcommand{\ctwovec}[2]{\left[\begin{array}{c}#1 \\ #2 \end{array}\right]}\) \(\newcommand{\threevec}[3]{\left[\begin{array}{r}#1 \\ #2 \\ #3 \end{array}\right]}\) \(\newcommand{\cthreevec}[3]{\left[\begin{array}{c}#1 \\ #2 \\ #3 \end{array}\right]}\) \(\newcommand{\fourvec}[4]{\left[\begin{array}{r}#1 \\ #2 \\ #3 \\ #4 \end{array}\right]}\) \(\newcommand{\cfourvec}[4]{\left[\begin{array}{c}#1 \\ #2 \\ #3 \\ #4 \end{array}\right]}\) \(\newcommand{\fivevec}[5]{\left[\begin{array}{r}#1 \\ #2 \\ #3 \\ #4 \\ #5 \\ \end{array}\right]}\) \(\newcommand{\cfivevec}[5]{\left[\begin{array}{c}#1 \\ #2 \\ #3 \\ #4 \\ #5 \\ \end{array}\right]}\) \(\newcommand{\mattwo}[4]{\left[\begin{array}{rr}#1 \amp #2 \\ #3 \amp #4 \\ \end{array}\right]}\) \(\newcommand{\laspan}[1]{\text{Span}\{#1\}}\) \(\newcommand{\bcal}{\cal B}\) \(\newcommand{\ccal}{\cal C}\) \(\newcommand{\scal}{\cal S}\) \(\newcommand{\wcal}{\cal W}\) \(\newcommand{\ecal}{\cal E}\) \(\newcommand{\coords}[2]{\left\{#1\right\}_{#2}}\) \(\newcommand{\gray}[1]{\color{gray}{#1}}\) \(\newcommand{\lgray}[1]{\color{lightgray}{#1}}\) \(\newcommand{\rank}{\operatorname{rank}}\) \(\newcommand{\row}{\text{Row}}\) \(\newcommand{\col}{\text{Col}}\) \(\renewcommand{\row}{\text{Row}}\) \(\newcommand{\nul}{\text{Nul}}\) \(\newcommand{\var}{\text{Var}}\) \(\newcommand{\corr}{\text{corr}}\) \(\newcommand{\len}[1]{\left|#1\right|}\) \(\newcommand{\bbar}{\overline{\bvec}}\) \(\newcommand{\bhat}{\widehat{\bvec}}\) \(\newcommand{\bperp}{\bvec^\perp}\) \(\newcommand{\xhat}{\widehat{\xvec}}\) \(\newcommand{\vhat}{\widehat{\vvec}}\) \(\newcommand{\uhat}{\widehat{\uvec}}\) \(\newcommand{\what}{\widehat{\wvec}}\) \(\newcommand{\Sighat}{\widehat{\Sigma}}\) \(\newcommand{\lt}{<}\) \(\newcommand{\gt}{>}\) \(\newcommand{\amp}{&}\) \(\definecolor{fillinmathshade}{gray}{0.9}\)Esta lección te ayudará a aprender y practicar los Modos de Flash. En Get the Basics, obtendrás explicaciones y fotos para construir comprensión. En Explore, encontrará recursos adicionales en línea para obtener más información. ¡Es importante revisar y aprender de estos recursos también! Tendrás oportunidades para practicar en Construye tus Habilidades. Por último, responda las preguntas en Registre sus hallazgos al final de este tema, Asegúrese de incluir la información que aprendió de los recursos de Explore.
Obtenga los conceptos básicos
En el capítulo anterior, aprendiste mucho sobre la luz. Puede haber momentos en los que quieras tomar una foto y no habrá suficiente luz. Necesitarás algo de luz extra. Ese es el propósito del flash de tu cámara digital. Cuando usa flash, su cámara suministra una breve ráfaga de luz cronometrada con el obturador de la cámara digital.
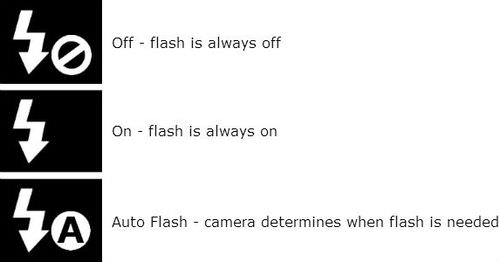
Conocer la configuración del flash para tu cámara digital es importante. La configuración más común es cambiar entre los modos Apagado, Encendido y Flash automático. Los iconos para estos ajustes pueden variar, pero generalmente se ven así:
A veces, usar la configuración de poca luz de tu cámara digital produce una mejor foto que usar el flash. En ese caso, pondrías flash en Off, para que no parpadeara. Otras veces, es posible que solo necesites un pequeño impulso y puedes configurar el flash en On, por lo que parpadeará independientemente de otras configuraciones. Si no estás seguro, deja tu flash configurado en Auto y la cámara decidirá si necesitas flash para tu foto.
Además, muchas cámaras digitales cuentan con opciones +/— que ajustan la intensidad del flash. Vea si el suyo tiene una opción de flash +/—. Si lo hace, puede aumentar la intensidad del flash con el + y disminuir la intensidad del flash con el —.
Explora
Obtenga más información sobre los modos de flash de cámara digital, incluida la reducción de ojos rojos y el flash de relleno (abordado en su propia lección) en Modos de flash explicados simplemente por Digital Photo Secrets:
www.digital-photo-secrets.com/secrets/39/flash-modes-explained-simply/
Desarrolla tus habilidades
Para desarrollar tus habilidades de flash, vas a disparar dos o más conjuntos de tres fotos. Elija una situación con poca luz para cada conjunto. En cada set, dispara con cada uno de los tres modos de flash principales: Apagado, Encendido y Flash automático.
Revisa tus fotos flash. Seleccione un conjunto de fotos que mejor demuestre los tres ajustes. Comparte tus fotos con tu profesor, y prepárate para discutir cómo muestran lo que has aprendido. Descarga tus fotos en una computadora para guardarlas para el portafolio que crearás en el proyecto final de fin de curso.
Registre sus hallazgos
- ¿Cuáles son los tres ajustes principales del flash y qué hacen?
- ¿Qué otros modos de flash pueden estar disponibles en algunas cámaras digitales?
- Para tu conjunto de fotos seleccionado, describe cómo la configuración del modo flash afectó a las fotos.
Referencias
Imagen | Referencia | Atribuciones |
---|---|---|
[Figura 1] |
Crédito: Stephen Politzer; 11 de julio de 2014 Fuente: creado por el autor del curso |