
2.6: Problemas
- Page ID
- 87533

\( \newcommand{\vecs}[1]{\overset { \scriptstyle \rightharpoonup} {\mathbf{#1}} } \)
\( \newcommand{\vecd}[1]{\overset{-\!-\!\rightharpoonup}{\vphantom{a}\smash {#1}}} \)
\( \newcommand{\id}{\mathrm{id}}\) \( \newcommand{\Span}{\mathrm{span}}\)
( \newcommand{\kernel}{\mathrm{null}\,}\) \( \newcommand{\range}{\mathrm{range}\,}\)
\( \newcommand{\RealPart}{\mathrm{Re}}\) \( \newcommand{\ImaginaryPart}{\mathrm{Im}}\)
\( \newcommand{\Argument}{\mathrm{Arg}}\) \( \newcommand{\norm}[1]{\| #1 \|}\)
\( \newcommand{\inner}[2]{\langle #1, #2 \rangle}\)
\( \newcommand{\Span}{\mathrm{span}}\)
\( \newcommand{\id}{\mathrm{id}}\)
\( \newcommand{\Span}{\mathrm{span}}\)
\( \newcommand{\kernel}{\mathrm{null}\,}\)
\( \newcommand{\range}{\mathrm{range}\,}\)
\( \newcommand{\RealPart}{\mathrm{Re}}\)
\( \newcommand{\ImaginaryPart}{\mathrm{Im}}\)
\( \newcommand{\Argument}{\mathrm{Arg}}\)
\( \newcommand{\norm}[1]{\| #1 \|}\)
\( \newcommand{\inner}[2]{\langle #1, #2 \rangle}\)
\( \newcommand{\Span}{\mathrm{span}}\) \( \newcommand{\AA}{\unicode[.8,0]{x212B}}\)
\( \newcommand{\vectorA}[1]{\vec{#1}} % arrow\)
\( \newcommand{\vectorAt}[1]{\vec{\text{#1}}} % arrow\)
\( \newcommand{\vectorB}[1]{\overset { \scriptstyle \rightharpoonup} {\mathbf{#1}} } \)
\( \newcommand{\vectorC}[1]{\textbf{#1}} \)
\( \newcommand{\vectorD}[1]{\overrightarrow{#1}} \)
\( \newcommand{\vectorDt}[1]{\overrightarrow{\text{#1}}} \)
\( \newcommand{\vectE}[1]{\overset{-\!-\!\rightharpoonup}{\vphantom{a}\smash{\mathbf {#1}}}} \)
\( \newcommand{\vecs}[1]{\overset { \scriptstyle \rightharpoonup} {\mathbf{#1}} } \)
\( \newcommand{\vecd}[1]{\overset{-\!-\!\rightharpoonup}{\vphantom{a}\smash {#1}}} \)
Preguntas de revisión
1. ¿Qué es un amplificador operacional?
2. Dé varios ejemplos de dónde podrían usarse los amplificadores operacionales.
3. ¿Cuál es el diseño típico del escenario de un amplificador operacional?
4. ¿Qué comprende la primera etapa de un amplificador operacional típico?
5. ¿Qué comprende la etapa final de un amplificador operacional típico?
6. ¿En qué se diferencia el diseño del circuito integrado del diseño discreto?
7. ¿Qué es un comparador y cómo podría usarse?
8. ¿Qué se entiende por construcción plana monolítica?
9. ¿Qué es una máscara y cómo se usa en la construcción de amplificadores operacionales IC?
10. ¿Cuál es el proceso de difusión y cómo se relaciona con la construcción de amplificadores operacionales IC?
11. ¿Cuáles son las ventajas de la construcción monolítica de CI?
12. ¿En qué se diferencia la construcción híbrida de la construcción monolítica?
Problemas
1. Para el circuito de la Figura\(\PageIndex{1}\),\(V_{out}\) busque las siguientes entradas:
a) 0 V
b) -1 V
c) +2 V
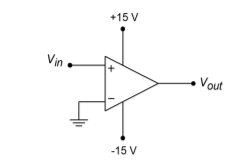
Figura\(\PageIndex{1}\)
2. Para el circuito de la Figura\(\PageIndex{2}\),\(V_{out}\) busque las siguientes entradas:
a) 0 V
b) -4 V
c) +5 V
d) -0.5 V
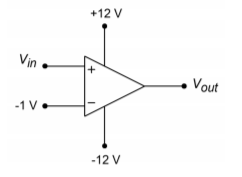
Figura\(\PageIndex{2}\)
3. Para el circuito de la Figura\(\PageIndex{3}\),\(V_{out}\) busque las siguientes entradas:
a) 0 V
b) -2 V
c) +1 V
d) -0.5 V
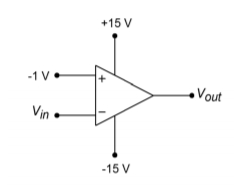
Figura\(\PageIndex{3}\)
4. Bosquejo\(V_{out}\) si está\(V_{in}(t) = 1 \sin 60t\) en la Figura\(\PageIndex{1}\).
5. Bosquejo\(V_{out}\) si está\(V_{in}(t) = 2 \sin 20t\) en la Figura\(\PageIndex{2}\).
6. Bosquejo\(V_{out}\) si está\(V_{in}(t) = 3 \sin 10t\) en la Figura\(\PageIndex{3}\).
7. Se utiliza una Resistencia Dependiente de Temperatura en el comparador de la Figura\(\PageIndex{4}\). ¿A qué temperatura cambiará de estado el comparador?
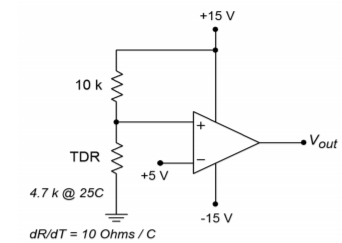
Figura\(\PageIndex{4}\)
8. ¿Cuál es el valor de la resistencia dependiente de la luz en el punto de disparo del comparador en la Figura\(\PageIndex{5}\)?
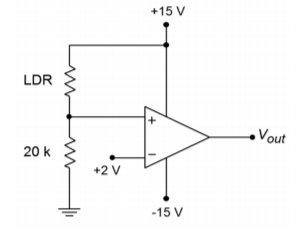
Figura\(\PageIndex{5}\)
9. ¿Qué voltaje de referencia se requiere para un punto de disparo\(50^{\circ}\) C en la Figura\(\PageIndex{4}\)?
Figura\(\PageIndex{6}\)
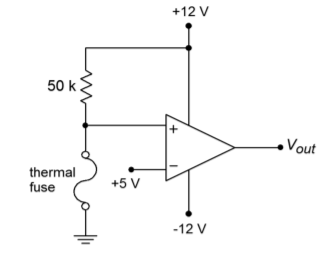
10. Un fusible térmico es un dispositivo que se encuentra en artículos tan comunes como cafeteras. Normalmente, su resistencia es muy baja, idealmente 0\(\Omega\). Con la aplicación de calor excesivo, el fusible se abre, presentando una resistencia muy alta, idealmente infinita. Explique el funcionamiento del circuito en la Figura\(\PageIndex{6}\). ¿El voltaje de salida es normalmente alto o bajo?
11. Una galga extensométrica es un dispositivo que se puede utilizar para medir la cantidad de curvatura o deflexión en una pieza a la que está unida. Se puede conectar para que su resistencia suba a medida que aumenta la curva. ¿Qué resistencia se requiere para hacer un disparo al comparador de Figura\(\PageIndex{7}\)?
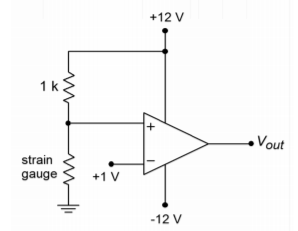
Figura\(\PageIndex{7}\)
12. Determinar la corriente que fluye fuera del colector de\(Q_{13}\) en la Figura 2.2.4.
Problema de simulación por computadora
13. Alterar el modelo de simulación simple presentado en el capítulo para incluir efectos de saturación. (Pista: Considere un dispositivo que limite el voltaje.)