APÉNDICE - Prueba del Teorema Z
- Page ID
- 114709
\( \newcommand{\vecs}[1]{\overset { \scriptstyle \rightharpoonup} {\mathbf{#1}} } \)
\( \newcommand{\vecd}[1]{\overset{-\!-\!\rightharpoonup}{\vphantom{a}\smash {#1}}} \)
\( \newcommand{\id}{\mathrm{id}}\) \( \newcommand{\Span}{\mathrm{span}}\)
( \newcommand{\kernel}{\mathrm{null}\,}\) \( \newcommand{\range}{\mathrm{range}\,}\)
\( \newcommand{\RealPart}{\mathrm{Re}}\) \( \newcommand{\ImaginaryPart}{\mathrm{Im}}\)
\( \newcommand{\Argument}{\mathrm{Arg}}\) \( \newcommand{\norm}[1]{\| #1 \|}\)
\( \newcommand{\inner}[2]{\langle #1, #2 \rangle}\)
\( \newcommand{\Span}{\mathrm{span}}\)
\( \newcommand{\id}{\mathrm{id}}\)
\( \newcommand{\Span}{\mathrm{span}}\)
\( \newcommand{\kernel}{\mathrm{null}\,}\)
\( \newcommand{\range}{\mathrm{range}\,}\)
\( \newcommand{\RealPart}{\mathrm{Re}}\)
\( \newcommand{\ImaginaryPart}{\mathrm{Im}}\)
\( \newcommand{\Argument}{\mathrm{Arg}}\)
\( \newcommand{\norm}[1]{\| #1 \|}\)
\( \newcommand{\inner}[2]{\langle #1, #2 \rangle}\)
\( \newcommand{\Span}{\mathrm{span}}\) \( \newcommand{\AA}{\unicode[.8,0]{x212B}}\)
\( \newcommand{\vectorA}[1]{\vec{#1}} % arrow\)
\( \newcommand{\vectorAt}[1]{\vec{\text{#1}}} % arrow\)
\( \newcommand{\vectorB}[1]{\overset { \scriptstyle \rightharpoonup} {\mathbf{#1}} } \)
\( \newcommand{\vectorC}[1]{\textbf{#1}} \)
\( \newcommand{\vectorD}[1]{\overrightarrow{#1}} \)
\( \newcommand{\vectorDt}[1]{\overrightarrow{\text{#1}}} \)
\( \newcommand{\vectE}[1]{\overset{-\!-\!\rightharpoonup}{\vphantom{a}\smash{\mathbf {#1}}}} \)
\( \newcommand{\vecs}[1]{\overset { \scriptstyle \rightharpoonup} {\mathbf{#1}} } \)
\( \newcommand{\vecd}[1]{\overset{-\!-\!\rightharpoonup}{\vphantom{a}\smash {#1}}} \)
\(\newcommand{\avec}{\mathbf a}\) \(\newcommand{\bvec}{\mathbf b}\) \(\newcommand{\cvec}{\mathbf c}\) \(\newcommand{\dvec}{\mathbf d}\) \(\newcommand{\dtil}{\widetilde{\mathbf d}}\) \(\newcommand{\evec}{\mathbf e}\) \(\newcommand{\fvec}{\mathbf f}\) \(\newcommand{\nvec}{\mathbf n}\) \(\newcommand{\pvec}{\mathbf p}\) \(\newcommand{\qvec}{\mathbf q}\) \(\newcommand{\svec}{\mathbf s}\) \(\newcommand{\tvec}{\mathbf t}\) \(\newcommand{\uvec}{\mathbf u}\) \(\newcommand{\vvec}{\mathbf v}\) \(\newcommand{\wvec}{\mathbf w}\) \(\newcommand{\xvec}{\mathbf x}\) \(\newcommand{\yvec}{\mathbf y}\) \(\newcommand{\zvec}{\mathbf z}\) \(\newcommand{\rvec}{\mathbf r}\) \(\newcommand{\mvec}{\mathbf m}\) \(\newcommand{\zerovec}{\mathbf 0}\) \(\newcommand{\onevec}{\mathbf 1}\) \(\newcommand{\real}{\mathbb R}\) \(\newcommand{\twovec}[2]{\left[\begin{array}{r}#1 \\ #2 \end{array}\right]}\) \(\newcommand{\ctwovec}[2]{\left[\begin{array}{c}#1 \\ #2 \end{array}\right]}\) \(\newcommand{\threevec}[3]{\left[\begin{array}{r}#1 \\ #2 \\ #3 \end{array}\right]}\) \(\newcommand{\cthreevec}[3]{\left[\begin{array}{c}#1 \\ #2 \\ #3 \end{array}\right]}\) \(\newcommand{\fourvec}[4]{\left[\begin{array}{r}#1 \\ #2 \\ #3 \\ #4 \end{array}\right]}\) \(\newcommand{\cfourvec}[4]{\left[\begin{array}{c}#1 \\ #2 \\ #3 \\ #4 \end{array}\right]}\) \(\newcommand{\fivevec}[5]{\left[\begin{array}{r}#1 \\ #2 \\ #3 \\ #4 \\ #5 \\ \end{array}\right]}\) \(\newcommand{\cfivevec}[5]{\left[\begin{array}{c}#1 \\ #2 \\ #3 \\ #4 \\ #5 \\ \end{array}\right]}\) \(\newcommand{\mattwo}[4]{\left[\begin{array}{rr}#1 \amp #2 \\ #3 \amp #4 \\ \end{array}\right]}\) \(\newcommand{\laspan}[1]{\text{Span}\{#1\}}\) \(\newcommand{\bcal}{\cal B}\) \(\newcommand{\ccal}{\cal C}\) \(\newcommand{\scal}{\cal S}\) \(\newcommand{\wcal}{\cal W}\) \(\newcommand{\ecal}{\cal E}\) \(\newcommand{\coords}[2]{\left\{#1\right\}_{#2}}\) \(\newcommand{\gray}[1]{\color{gray}{#1}}\) \(\newcommand{\lgray}[1]{\color{lightgray}{#1}}\) \(\newcommand{\rank}{\operatorname{rank}}\) \(\newcommand{\row}{\text{Row}}\) \(\newcommand{\col}{\text{Col}}\) \(\renewcommand{\row}{\text{Row}}\) \(\newcommand{\nul}{\text{Nul}}\) \(\newcommand{\var}{\text{Var}}\) \(\newcommand{\corr}{\text{corr}}\) \(\newcommand{\len}[1]{\left|#1\right|}\) \(\newcommand{\bbar}{\overline{\bvec}}\) \(\newcommand{\bhat}{\widehat{\bvec}}\) \(\newcommand{\bperp}{\bvec^\perp}\) \(\newcommand{\xhat}{\widehat{\xvec}}\) \(\newcommand{\vhat}{\widehat{\vvec}}\) \(\newcommand{\uhat}{\widehat{\uvec}}\) \(\newcommand{\what}{\widehat{\wvec}}\) \(\newcommand{\Sighat}{\widehat{\Sigma}}\) \(\newcommand{\lt}{<}\) \(\newcommand{\gt}{>}\) \(\newcommand{\amp}{&}\) \(\definecolor{fillinmathshade}{gray}{0.9}\)En la sección 1.4 afirmamos pero no probamos el siguiente teorema:
Si dos líneas son paralelas entonces sus ángulos interiores alternos son iguales. Si los ángulos interiores alternos de dos líneas son iguales entonces las líneas deben ser paralelas.
Teorema\(\PageIndex{1}\) consta de dos declaraciones, cada una la conversa de la otra, Vamos a probar la segunda declaración primero:
Si los ángulos interiores alternos de dos líneas son iguales entonces las líneas deben ser paralelas. En la Figura\(\PageIndex{1}\), if \(\angle x = \angle x'\) then \(\overleftrightarrow{AB}\) must be parallel to \(\overleftrightarrow{CD}\).
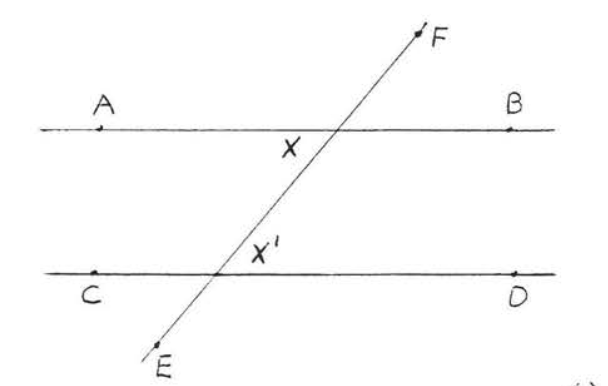
Figura\(\PageIndex{1}\). We will prove that if \(\angle x = \angle x'\) then \(\overleftrightarrow{AB}\) is parallel to \(\overleftrightarrow{CD}\).
- Proof
-
Suppose \(\angle x = \angle x'\) and \(\overleftrightarrow{AB}\) is not parallel to \(\overleftrightarrow{CD}\). This means that \(\overleftrightarrow{AB}\) and \(\overleftrightarrow{CD}\) meet at some point \(G\), as in Figure \(\PageIndex{2}\), forming a triangle, \(\triangle KLG\).
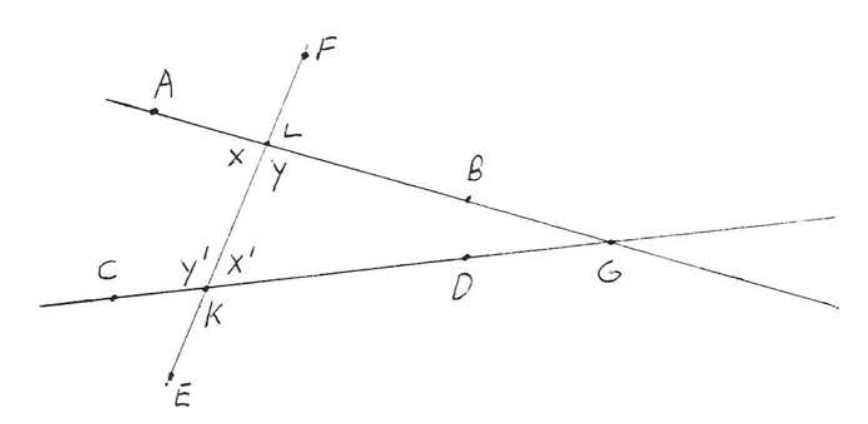
Figure \(\PageIndex{2}\). If \(\overleftrightarrow{AB}\) is not parallel to \(\overleftrightarrow{CD}\) then they must meet at some point \(G\).
We know from the discussion preceding the ASA Theorem (THEOREM 2.3.1, section 2.3) that \(\triangle KLG\) can be constructed from the two angles \(\angle x'\) and \(\angle y\) and the included side \(KL\). Now \(\angle x = \angle x'\) (by assumption) and \(\angle y' = \angle y\) (\(\angle y' = 180^{\circ} - \angle x' = 180^{\circ} - \angle x = \angle y\)). Therefore by the same construction \(\angle x\) and \(\angle y'\) when extended should yield a triangle congruent to \(\triangle KLG\). Call this new triangle \(\triangle LKH\) (see Figure \(\PageIndex{3}\)). We now have that \(\overleftrightarrow{AB}\) and \(\overleftrightarrow{CD}\) are both straight lines through \(G\) and \(H\). This is impossible since one and only one distinct straight line can be drawn through two points. Therefore our assumption that \(\overleftrightarrow{AB}\) is not parallel to \(\overleftrightarrow{CD}\) is incorrect, that is, \(\overleftrightarrow{AB}\) must be parallel to \(\overleftrightarrow{CD}\). This completes the proof.
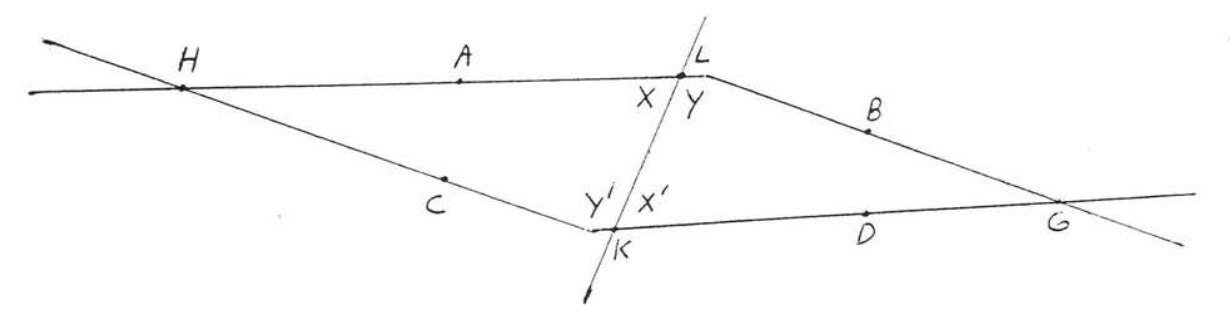
Figura\(\PageIndex{3}\). Desde\(\angle x = \angle x'\) y\(\angle y' = \angle y\),\(\angle x\) y\(\angle y'\) cuando se extiende también debe formar un triángulo,\(\triangle LXH\).
Si dos líneas son paralelas entonces sus ángulos interiores alternos son iguales. En la Figura\(\PageIndex{4}\), if \(\overleftrightarrow{AB}\) is parallel to \(\overleftrightarrow{CD}\) then \(\angle x = \angle x'\).
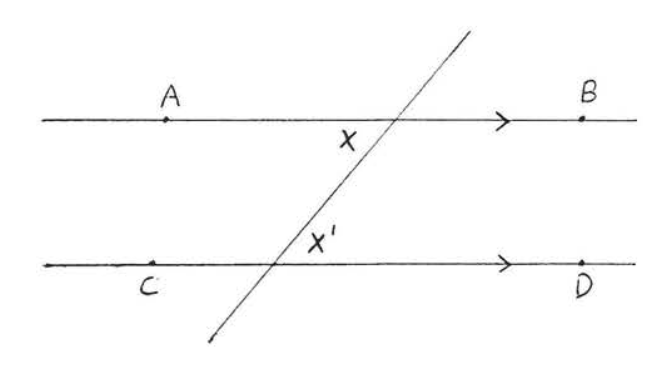
Figura\(\PageIndex{4}\). We will prove that if \(\overleftrightarrow{AB}\) is parallel to \(\overleftrightarrow{CD}\) then \(\angle x = \angle x'\).
- Proof
-
Suppose \(\overleftrightarrow{AB}\) is parallel to \(\overleftrightarrow{CD}\) and \(\angle x \ne \angle x'\). One of the angles is larger; suppose it is \(\angle x\) that is larger. Draw \(\overleftrightarrow{EF}\) through \(P\) so that \(\angle w = \angle w'\) as in Figure \(\PageIndex{5}\). \(\overleftrightarrow{EF}\) is parallel to \(\overleftrightarrow{CD}\) because we have just prove (THEOREM \(\PageIndex{1}\), second part) that two lines are parallel if their alternate interior angles are equal. This contradicts the parallel postulate (section 1.4) which states that through a point not on a given line (here point \(P\) and line \(\overleftrightarrow{CD}\)) one and only one line can be drawn parallel to the given line. Therefore \(\angle x\) must be equal to \(\angle x'\). This completes the proof of THEOREM \(\PageIndex{1}\).
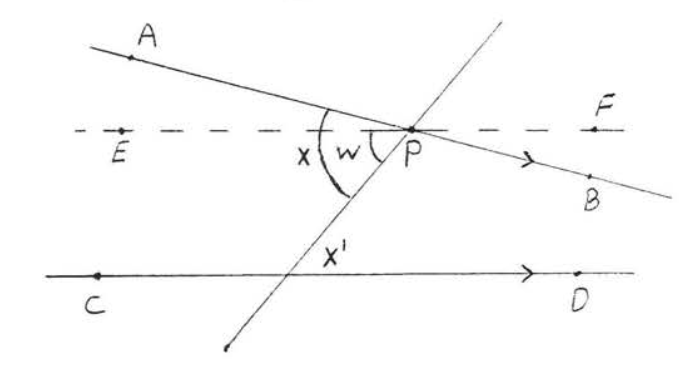
Figura\(\PageIndex{5}\). Draw \(\overleftrightarrow{EF}\) so that \(\angle w = \angle w'\).