10.6: Ángulos después de la inversión
- Page ID
- 114464
\( \newcommand{\vecs}[1]{\overset { \scriptstyle \rightharpoonup} {\mathbf{#1}} } \)
\( \newcommand{\vecd}[1]{\overset{-\!-\!\rightharpoonup}{\vphantom{a}\smash {#1}}} \)
\( \newcommand{\id}{\mathrm{id}}\) \( \newcommand{\Span}{\mathrm{span}}\)
( \newcommand{\kernel}{\mathrm{null}\,}\) \( \newcommand{\range}{\mathrm{range}\,}\)
\( \newcommand{\RealPart}{\mathrm{Re}}\) \( \newcommand{\ImaginaryPart}{\mathrm{Im}}\)
\( \newcommand{\Argument}{\mathrm{Arg}}\) \( \newcommand{\norm}[1]{\| #1 \|}\)
\( \newcommand{\inner}[2]{\langle #1, #2 \rangle}\)
\( \newcommand{\Span}{\mathrm{span}}\)
\( \newcommand{\id}{\mathrm{id}}\)
\( \newcommand{\Span}{\mathrm{span}}\)
\( \newcommand{\kernel}{\mathrm{null}\,}\)
\( \newcommand{\range}{\mathrm{range}\,}\)
\( \newcommand{\RealPart}{\mathrm{Re}}\)
\( \newcommand{\ImaginaryPart}{\mathrm{Im}}\)
\( \newcommand{\Argument}{\mathrm{Arg}}\)
\( \newcommand{\norm}[1]{\| #1 \|}\)
\( \newcommand{\inner}[2]{\langle #1, #2 \rangle}\)
\( \newcommand{\Span}{\mathrm{span}}\) \( \newcommand{\AA}{\unicode[.8,0]{x212B}}\)
\( \newcommand{\vectorA}[1]{\vec{#1}} % arrow\)
\( \newcommand{\vectorAt}[1]{\vec{\text{#1}}} % arrow\)
\( \newcommand{\vectorB}[1]{\overset { \scriptstyle \rightharpoonup} {\mathbf{#1}} } \)
\( \newcommand{\vectorC}[1]{\textbf{#1}} \)
\( \newcommand{\vectorD}[1]{\overrightarrow{#1}} \)
\( \newcommand{\vectorDt}[1]{\overrightarrow{\text{#1}}} \)
\( \newcommand{\vectE}[1]{\overset{-\!-\!\rightharpoonup}{\vphantom{a}\smash{\mathbf {#1}}}} \)
\( \newcommand{\vecs}[1]{\overset { \scriptstyle \rightharpoonup} {\mathbf{#1}} } \)
\( \newcommand{\vecd}[1]{\overset{-\!-\!\rightharpoonup}{\vphantom{a}\smash {#1}}} \)
\(\newcommand{\avec}{\mathbf a}\) \(\newcommand{\bvec}{\mathbf b}\) \(\newcommand{\cvec}{\mathbf c}\) \(\newcommand{\dvec}{\mathbf d}\) \(\newcommand{\dtil}{\widetilde{\mathbf d}}\) \(\newcommand{\evec}{\mathbf e}\) \(\newcommand{\fvec}{\mathbf f}\) \(\newcommand{\nvec}{\mathbf n}\) \(\newcommand{\pvec}{\mathbf p}\) \(\newcommand{\qvec}{\mathbf q}\) \(\newcommand{\svec}{\mathbf s}\) \(\newcommand{\tvec}{\mathbf t}\) \(\newcommand{\uvec}{\mathbf u}\) \(\newcommand{\vvec}{\mathbf v}\) \(\newcommand{\wvec}{\mathbf w}\) \(\newcommand{\xvec}{\mathbf x}\) \(\newcommand{\yvec}{\mathbf y}\) \(\newcommand{\zvec}{\mathbf z}\) \(\newcommand{\rvec}{\mathbf r}\) \(\newcommand{\mvec}{\mathbf m}\) \(\newcommand{\zerovec}{\mathbf 0}\) \(\newcommand{\onevec}{\mathbf 1}\) \(\newcommand{\real}{\mathbb R}\) \(\newcommand{\twovec}[2]{\left[\begin{array}{r}#1 \\ #2 \end{array}\right]}\) \(\newcommand{\ctwovec}[2]{\left[\begin{array}{c}#1 \\ #2 \end{array}\right]}\) \(\newcommand{\threevec}[3]{\left[\begin{array}{r}#1 \\ #2 \\ #3 \end{array}\right]}\) \(\newcommand{\cthreevec}[3]{\left[\begin{array}{c}#1 \\ #2 \\ #3 \end{array}\right]}\) \(\newcommand{\fourvec}[4]{\left[\begin{array}{r}#1 \\ #2 \\ #3 \\ #4 \end{array}\right]}\) \(\newcommand{\cfourvec}[4]{\left[\begin{array}{c}#1 \\ #2 \\ #3 \\ #4 \end{array}\right]}\) \(\newcommand{\fivevec}[5]{\left[\begin{array}{r}#1 \\ #2 \\ #3 \\ #4 \\ #5 \\ \end{array}\right]}\) \(\newcommand{\cfivevec}[5]{\left[\begin{array}{c}#1 \\ #2 \\ #3 \\ #4 \\ #5 \\ \end{array}\right]}\) \(\newcommand{\mattwo}[4]{\left[\begin{array}{rr}#1 \amp #2 \\ #3 \amp #4 \\ \end{array}\right]}\) \(\newcommand{\laspan}[1]{\text{Span}\{#1\}}\) \(\newcommand{\bcal}{\cal B}\) \(\newcommand{\ccal}{\cal C}\) \(\newcommand{\scal}{\cal S}\) \(\newcommand{\wcal}{\cal W}\) \(\newcommand{\ecal}{\cal E}\) \(\newcommand{\coords}[2]{\left\{#1\right\}_{#2}}\) \(\newcommand{\gray}[1]{\color{gray}{#1}}\) \(\newcommand{\lgray}[1]{\color{lightgray}{#1}}\) \(\newcommand{\rank}{\operatorname{rank}}\) \(\newcommand{\row}{\text{Row}}\) \(\newcommand{\col}{\text{Col}}\) \(\renewcommand{\row}{\text{Row}}\) \(\newcommand{\nul}{\text{Nul}}\) \(\newcommand{\var}{\text{Var}}\) \(\newcommand{\corr}{\text{corr}}\) \(\newcommand{\len}[1]{\left|#1\right|}\) \(\newcommand{\bbar}{\overline{\bvec}}\) \(\newcommand{\bhat}{\widehat{\bvec}}\) \(\newcommand{\bperp}{\bvec^\perp}\) \(\newcommand{\xhat}{\widehat{\xvec}}\) \(\newcommand{\vhat}{\widehat{\vvec}}\) \(\newcommand{\uhat}{\widehat{\uvec}}\) \(\newcommand{\what}{\widehat{\wvec}}\) \(\newcommand{\Sighat}{\widehat{\Sigma}}\) \(\newcommand{\lt}{<}\) \(\newcommand{\gt}{>}\) \(\newcommand{\amp}{&}\) \(\definecolor{fillinmathshade}{gray}{0.9}\)En el plano inversivo, la inversa de un arco es un arco.
- Prueba
-
Considerar cuatro puntos distintos\(A, B, C\), y\(D\); dejar\(A', B', C'\), y\(D'\) ser sus inversos. Tenemos que demostrar que\(D\) se encuentra en el arco\(ABC\) si y sólo si\(D'\) yace en el arco\(A'B'C'\). Según la Proposición 9.5.1, esta última equivale a lo siguiente:
\(\measuredangle ADC = \measuredangle ABC \Leftrightarrow \measuredangle A'D'C' = \measuredangle A'B'C'.\)
Este último se desprende del Teorema 10.2.1b.
El siguiente teorema establece que el ángulo entre arcos cambia solo su signo después de la inversión.
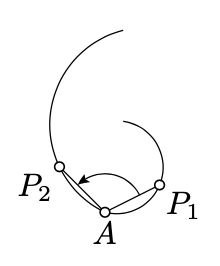
Que\(AB_1C_1\),\(AB_2C_2\) sean dos arcos en el plano inversivo, y los arcos\(A'B_1'C_1'\),\(A'B_2'C_2'\) sean sus inversos. Dejar\([AX_1)\) y\([AX_2)\) ser las medias líneas tangentes a\(AB_1C_1\) y\(AB_2C_2\) en\(A\),\([A'Y_1)\) y\([A'Y_2)\) ser las medias líneas tangentes a\(A'B_1'C_1'\) y\(A'B_2'C_2'\) en\(A'\). Entonces
\(\measuredangle X_1AX_2 \equiv -\measuredangle Y_1A'Y_2\).
- Prueba
-
Aplicando a la Proposición 9.6.1,
\(\begin{array} {rcl} {\measuredangle X_1AX_2} & \equiv & {\measuredangle X_1AC_1 + \measuredangle C_1AC_2 + \measuredangle C_2AX_2 \equiv} \\ {} & \equiv & {(\pi - \measuredangle C_1B_1A) + \measuredangle C_1AC_2 + (\pi - \measuredangle AB_2C_2) \equiv} \\ {} & \equiv & {-(\measuredangle C_1B_1A + \measuredangle AB_2C_2 + \measuredangle C_2AC_1) \equiv} \\ {} & \equiv & {-(\measuredangle C_1B_1A + \measuredangle AB_2C_1) -(\measuredangle C_1B_2C_2 + \measuredangle C_2AC_1).} \end{array}\)
De la misma manera que lo conseguimos
\(\measuredangle Y_1A'Y_2 \equiv -(\measuredangle C_1'B_1'A' + \measuredangle A'B_2'C_1') - (\measuredangle C_1'B_2'C_2' + \measuredangle C_2'A'C_1').\)
Por Teorema 10.2.1b,
\(\begin{array} {rcl} {\measuredangle C_1B_1A + \measuredangle AB_2C_1} & \equiv & {-(\measuredangle C_1'B_1'A' + \measuredangle A'B_2'C_1'),} \\ {\measuredangle C_1B_2C_2 + \measuredangle C_2AC_1} & \equiv & {-(\measuredangle C_1'B_2'C_2' + \measuredangle C_2'A'C_1')} \end{array}\).
y de ahí el resultado.
El ángulo entre arcos se puede definir como el ángulo entre sus medias líneas tangentes en el punto final común. Por lo tanto, bajo inversión, los ángulos entre arcos se conservan hasta firmar.
Del Ejercicio 5.7.4 se deduce que el ángulo entre arcos con punto final común A es el límite de\(\measuredangle P_1AP_2\) dónde\(P_1\) y\(P_2\) son puntos que se aproximan a\(A\) lo largo de los arcos correspondientes. Esta observación se puede utilizar para definir el ángulo entre un par de curvas que emergen de un punto. Resulta que bajo inversión, los ángulos entre curvas también se conservan hasta firmar.
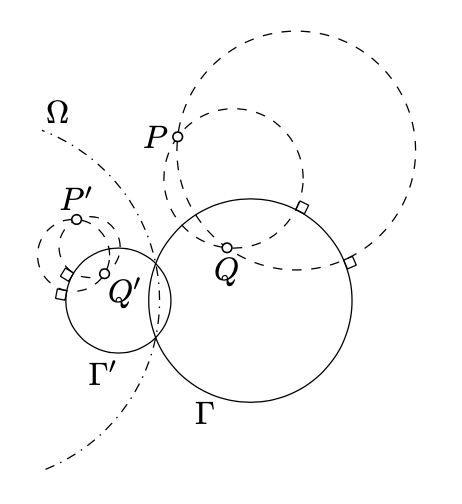
Dejar\(P\) ser la inversa de punto\(Q\) en un círculo\(\Gamma\). Supongamos que\(P'\)\(Q'\),, y\(\Gamma'\) son las inversas de\(P, Q\), y\(\Gamma\) en otro círculo\(\Omega\). Entonces\(P'\) es la inversa de\(Q'\) in\(\Gamma'\).
- Prueba
-
Si\(P = Q\), entonces\(P'=Q' \in \Gamma'\). Por lo tanto,\(P'\) es la inversa de\(Q'\) in\(\Gamma'\).
Queda por considerar el caso\(P \ne Q\). Dejar\(\Delta_2\) y\(\Delta_2\) ser dos círculos distintos que se cruzan en\(P\) y\(Q\). Según Corolario 10.5.2,\(\Delta_1 \perp \Gamma\) y\(\Delta_2 \perp \Gamma\).
Dejar\(\Delta_1'\) y\(\Delta_2'\) denotar las inversas de\(\Delta_1\) y\(\Delta_2\) dentro\(Omega\). Claramente,\(\Delta_1'\) se reúne\(\Delta_2'\) en\(P'\) y\(Q'\).
Por teorema\(\PageIndex{1}\),\(\Delta_1' \perp \Gamma'\) y\(\Delta_2' \perp \Gamma'\). Por Corolario 10.5.1,\(P'\) es la inversa de\(Q'\) in\(\Gamma'\).