
1.1.1: Movimientos en el Plano
- Page ID
- 118680

\( \newcommand{\vecs}[1]{\overset { \scriptstyle \rightharpoonup} {\mathbf{#1}} } \)
\( \newcommand{\vecd}[1]{\overset{-\!-\!\rightharpoonup}{\vphantom{a}\smash {#1}}} \)
\( \newcommand{\id}{\mathrm{id}}\) \( \newcommand{\Span}{\mathrm{span}}\)
( \newcommand{\kernel}{\mathrm{null}\,}\) \( \newcommand{\range}{\mathrm{range}\,}\)
\( \newcommand{\RealPart}{\mathrm{Re}}\) \( \newcommand{\ImaginaryPart}{\mathrm{Im}}\)
\( \newcommand{\Argument}{\mathrm{Arg}}\) \( \newcommand{\norm}[1]{\| #1 \|}\)
\( \newcommand{\inner}[2]{\langle #1, #2 \rangle}\)
\( \newcommand{\Span}{\mathrm{span}}\)
\( \newcommand{\id}{\mathrm{id}}\)
\( \newcommand{\Span}{\mathrm{span}}\)
\( \newcommand{\kernel}{\mathrm{null}\,}\)
\( \newcommand{\range}{\mathrm{range}\,}\)
\( \newcommand{\RealPart}{\mathrm{Re}}\)
\( \newcommand{\ImaginaryPart}{\mathrm{Im}}\)
\( \newcommand{\Argument}{\mathrm{Arg}}\)
\( \newcommand{\norm}[1]{\| #1 \|}\)
\( \newcommand{\inner}[2]{\langle #1, #2 \rangle}\)
\( \newcommand{\Span}{\mathrm{span}}\) \( \newcommand{\AA}{\unicode[.8,0]{x212B}}\)
\( \newcommand{\vectorA}[1]{\vec{#1}} % arrow\)
\( \newcommand{\vectorAt}[1]{\vec{\text{#1}}} % arrow\)
\( \newcommand{\vectorB}[1]{\overset { \scriptstyle \rightharpoonup} {\mathbf{#1}} } \)
\( \newcommand{\vectorC}[1]{\textbf{#1}} \)
\( \newcommand{\vectorD}[1]{\overrightarrow{#1}} \)
\( \newcommand{\vectorDt}[1]{\overrightarrow{\text{#1}}} \)
\( \newcommand{\vectE}[1]{\overset{-\!-\!\rightharpoonup}{\vphantom{a}\smash{\mathbf {#1}}}} \)
\( \newcommand{\vecs}[1]{\overset { \scriptstyle \rightharpoonup} {\mathbf{#1}} } \)
\( \newcommand{\vecd}[1]{\overset{-\!-\!\rightharpoonup}{\vphantom{a}\smash {#1}}} \)
Lección
Vamos a describir las formas en que las figuras pueden moverse en el plano.
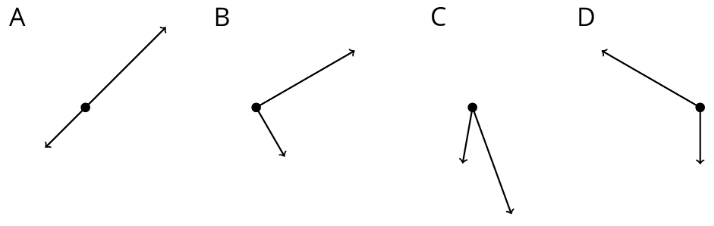
Ejercicio\(\PageIndex{1}\): Which One Doesn't Belong: Diagrams
¿Cuál no pertenece?
Ejercicio\(\PageIndex{2}\): Triangle Square Dance
Tu profesor te dará tres fotos. Cada uno muestra un conjunto diferente de movimientos de baile.
- Arregla las tres fotos para que tú y tu pareja puedan verlas bien hacia arriba. Elige quién iniciará el juego.
- El jugador titular elige mentalmente A, B o C y describe el baile al otro jugador.
- El otro jugador identifica de qué baile se habla: A, B o C.
- Después de una ronda, los roles comerciales. Cuando hayas descrito los tres bailes, llega a un acuerdo sobre las palabras que usas para describir los movimientos en cada baile.
- Con tu pareja, escribe una descripción de los movimientos en cada baile.
Baile A:
Danza B:
Danza C:
¿Estás listo para más?
Podríamos pensar en cada baile como un baile nuevo ejecutándolo a la inversa, comenzando en el 6to cuadro y trabajando hacia atrás al primero.
- Escoge un baile y describe con palabras uno de estos bailes invertidos.
- ¿Cómo se comparan las indicaciones para correr tu baile en la dirección hacia adelante y en la dirección inversa?
Resumen
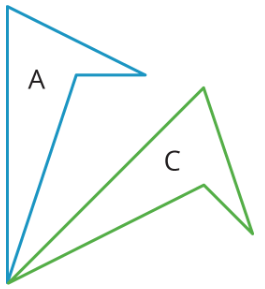
Aquí hay dos formas de cambiar la posición de una figura en un plano sin cambiar su forma o tamaño:
- Deslizar o desplazar la figura sin girarla. Desplazando la Figura A hacia la derecha y hacia arriba la coloca en la posición de la Figura B.

- Girar o rotar la figura alrededor de un punto. La Figura A se gira alrededor del vértice inferior para crear la Figura C.
Practica
Ejercicio\(\PageIndex{3}\)
Los seis marcos muestran diferentes posiciones de una forma.

Describe cómo se mueve la forma para pasar de su posición en cada fotograma al siguiente.
Ejercicio\(\PageIndex{4}\)
Estos cinco marcos muestran las diferentes posiciones de una forma.

Describe cómo se mueve la forma para pasar de su posición en cada fotograma al siguiente.
Ejercicio\(\PageIndex{5}\)
Diego comenzó con esta forma.

Diego mueve la forma hacia abajo, la gira 90 grados en el sentido de las agujas del reloj, luego mueve la forma hacia la derecha. Dibuja la ubicación de la forma después de cada movimiento.