1.12: Construcciones y Bisectores
- Page ID
- 107589
\( \newcommand{\vecs}[1]{\overset { \scriptstyle \rightharpoonup} {\mathbf{#1}} } \)
\( \newcommand{\vecd}[1]{\overset{-\!-\!\rightharpoonup}{\vphantom{a}\smash {#1}}} \)
\( \newcommand{\dsum}{\displaystyle\sum\limits} \)
\( \newcommand{\dint}{\displaystyle\int\limits} \)
\( \newcommand{\dlim}{\displaystyle\lim\limits} \)
\( \newcommand{\id}{\mathrm{id}}\) \( \newcommand{\Span}{\mathrm{span}}\)
( \newcommand{\kernel}{\mathrm{null}\,}\) \( \newcommand{\range}{\mathrm{range}\,}\)
\( \newcommand{\RealPart}{\mathrm{Re}}\) \( \newcommand{\ImaginaryPart}{\mathrm{Im}}\)
\( \newcommand{\Argument}{\mathrm{Arg}}\) \( \newcommand{\norm}[1]{\| #1 \|}\)
\( \newcommand{\inner}[2]{\langle #1, #2 \rangle}\)
\( \newcommand{\Span}{\mathrm{span}}\)
\( \newcommand{\id}{\mathrm{id}}\)
\( \newcommand{\Span}{\mathrm{span}}\)
\( \newcommand{\kernel}{\mathrm{null}\,}\)
\( \newcommand{\range}{\mathrm{range}\,}\)
\( \newcommand{\RealPart}{\mathrm{Re}}\)
\( \newcommand{\ImaginaryPart}{\mathrm{Im}}\)
\( \newcommand{\Argument}{\mathrm{Arg}}\)
\( \newcommand{\norm}[1]{\| #1 \|}\)
\( \newcommand{\inner}[2]{\langle #1, #2 \rangle}\)
\( \newcommand{\Span}{\mathrm{span}}\) \( \newcommand{\AA}{\unicode[.8,0]{x212B}}\)
\( \newcommand{\vectorA}[1]{\vec{#1}} % arrow\)
\( \newcommand{\vectorAt}[1]{\vec{\text{#1}}} % arrow\)
\( \newcommand{\vectorB}[1]{\overset { \scriptstyle \rightharpoonup} {\mathbf{#1}} } \)
\( \newcommand{\vectorC}[1]{\textbf{#1}} \)
\( \newcommand{\vectorD}[1]{\overrightarrow{#1}} \)
\( \newcommand{\vectorDt}[1]{\overrightarrow{\text{#1}}} \)
\( \newcommand{\vectE}[1]{\overset{-\!-\!\rightharpoonup}{\vphantom{a}\smash{\mathbf {#1}}}} \)
\( \newcommand{\vecs}[1]{\overset { \scriptstyle \rightharpoonup} {\mathbf{#1}} } \)
\( \newcommand{\vecd}[1]{\overset{-\!-\!\rightharpoonup}{\vphantom{a}\smash {#1}}} \)
\(\newcommand{\avec}{\mathbf a}\) \(\newcommand{\bvec}{\mathbf b}\) \(\newcommand{\cvec}{\mathbf c}\) \(\newcommand{\dvec}{\mathbf d}\) \(\newcommand{\dtil}{\widetilde{\mathbf d}}\) \(\newcommand{\evec}{\mathbf e}\) \(\newcommand{\fvec}{\mathbf f}\) \(\newcommand{\nvec}{\mathbf n}\) \(\newcommand{\pvec}{\mathbf p}\) \(\newcommand{\qvec}{\mathbf q}\) \(\newcommand{\svec}{\mathbf s}\) \(\newcommand{\tvec}{\mathbf t}\) \(\newcommand{\uvec}{\mathbf u}\) \(\newcommand{\vvec}{\mathbf v}\) \(\newcommand{\wvec}{\mathbf w}\) \(\newcommand{\xvec}{\mathbf x}\) \(\newcommand{\yvec}{\mathbf y}\) \(\newcommand{\zvec}{\mathbf z}\) \(\newcommand{\rvec}{\mathbf r}\) \(\newcommand{\mvec}{\mathbf m}\) \(\newcommand{\zerovec}{\mathbf 0}\) \(\newcommand{\onevec}{\mathbf 1}\) \(\newcommand{\real}{\mathbb R}\) \(\newcommand{\twovec}[2]{\left[\begin{array}{r}#1 \\ #2 \end{array}\right]}\) \(\newcommand{\ctwovec}[2]{\left[\begin{array}{c}#1 \\ #2 \end{array}\right]}\) \(\newcommand{\threevec}[3]{\left[\begin{array}{r}#1 \\ #2 \\ #3 \end{array}\right]}\) \(\newcommand{\cthreevec}[3]{\left[\begin{array}{c}#1 \\ #2 \\ #3 \end{array}\right]}\) \(\newcommand{\fourvec}[4]{\left[\begin{array}{r}#1 \\ #2 \\ #3 \\ #4 \end{array}\right]}\) \(\newcommand{\cfourvec}[4]{\left[\begin{array}{c}#1 \\ #2 \\ #3 \\ #4 \end{array}\right]}\) \(\newcommand{\fivevec}[5]{\left[\begin{array}{r}#1 \\ #2 \\ #3 \\ #4 \\ #5 \\ \end{array}\right]}\) \(\newcommand{\cfivevec}[5]{\left[\begin{array}{c}#1 \\ #2 \\ #3 \\ #4 \\ #5 \\ \end{array}\right]}\) \(\newcommand{\mattwo}[4]{\left[\begin{array}{rr}#1 \amp #2 \\ #3 \amp #4 \\ \end{array}\right]}\) \(\newcommand{\laspan}[1]{\text{Span}\{#1\}}\) \(\newcommand{\bcal}{\cal B}\) \(\newcommand{\ccal}{\cal C}\) \(\newcommand{\scal}{\cal S}\) \(\newcommand{\wcal}{\cal W}\) \(\newcommand{\ecal}{\cal E}\) \(\newcommand{\coords}[2]{\left\{#1\right\}_{#2}}\) \(\newcommand{\gray}[1]{\color{gray}{#1}}\) \(\newcommand{\lgray}[1]{\color{lightgray}{#1}}\) \(\newcommand{\rank}{\operatorname{rank}}\) \(\newcommand{\row}{\text{Row}}\) \(\newcommand{\col}{\text{Col}}\) \(\renewcommand{\row}{\text{Row}}\) \(\newcommand{\nul}{\text{Nul}}\) \(\newcommand{\var}{\text{Var}}\) \(\newcommand{\corr}{\text{corr}}\) \(\newcommand{\len}[1]{\left|#1\right|}\) \(\newcommand{\bbar}{\overline{\bvec}}\) \(\newcommand{\bhat}{\widehat{\bvec}}\) \(\newcommand{\bperp}{\bvec^\perp}\) \(\newcommand{\xhat}{\widehat{\xvec}}\) \(\newcommand{\vhat}{\widehat{\vvec}}\) \(\newcommand{\uhat}{\widehat{\uvec}}\) \(\newcommand{\what}{\widehat{\wvec}}\) \(\newcommand{\Sighat}{\widehat{\Sigma}}\) \(\newcommand{\lt}{<}\) \(\newcommand{\gt}{>}\) \(\newcommand{\amp}{&}\) \(\definecolor{fillinmathshade}{gray}{0.9}\)Construir ángulos y segmentos de línea. Divida los ángulos y los segmentos de línea en dos partes congruentes.
Bisectores de segmentos de línea y ángulos
Describir cómo construir un\(45^{\circ}\) ángulo usando una brújula y una recta.
Bisectores
Una construcción es similar a un dibujo en que produce un resultado visual. Sin embargo, si bien los dibujos suelen ser solo bocetos aproximados que ayudan a transmitir una idea, las construcciones son procesos paso a paso que se utilizan para crear figuras geométricas precisas. Para crear una construcción a mano, hay algunas herramientas que puedes usar:
- Brújula: Un dispositivo que permite crear un círculo con un radio dado. No sólo las brújulas pueden ayudarte a crear círculos, sino que también te pueden ayudar a copiar distancias.
- Enderezado: Cualquier cosa que le permita producir una línea recta. Una recta no debe ser capaz de medir distancias. Una tarjeta de índice funciona bien como una recta. También puedes usar una regla como regla recta, siempre y cuando solo la uses para dibujar líneas rectas y no para medir.
- Papel: Cuando una figura geométrica está sobre una hoja de papel, el papel mismo se puede plegar para construir nuevas líneas.
Bisecar un segmento o un ángulo significa dividirlo en dos partes congruentes. Una bisectriz de un segmento de línea pasará por el punto medio del segmento de línea. Una bisectriz perpendicular de un segmento pasa por el punto medio del segmento de línea y es perpendicular al segmento de línea. Para construir bisectores de segmentos y ángulos, es útil recordar algunos teoremas relevantes:
Cualquier punto en la bisectriz perpendicular de un segmento de línea será equidistante de los puntos finales del segmento de línea. Esto significa que una manera de encontrar la bisectriz perpendicular de un segmento (como la\(\overline{AB}\) siguiente) es encontrar dos puntos que sean equidistantes de los puntos finales del segmento de línea (como C y D abajo) y conectarlos.
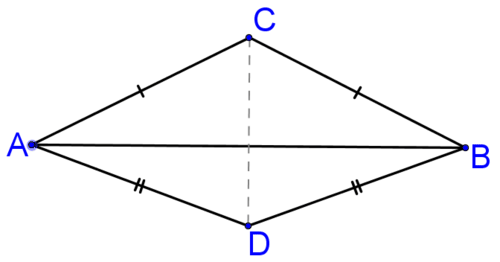 Figura\(\PageIndex{1}\)
Cualquier punto en el ángulo bisectriz de un ángulo será equidistante de los rayos que crean el ángulo. Esto significa que una forma de encontrar el ángulo bisectriz de un ángulo (como el\(\angle BAC\) siguiente) es encontrar dos puntos que sean equidistantes de los rayos que crean el ángulo (como los puntos A y D inferiores).
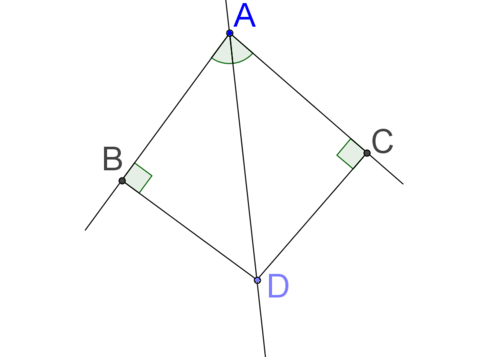 Figura\(\PageIndex{2}\)
Echemos un vistazo a diferentes formas de encontrar la bisectriz perpendicular de un segmento de línea.
1. Dibuja un segmento de línea como el naranja de abajo en una hoja de papel (el rectángulo de abajo representa el papel). Dobla el papel para encontrar la bisectriz perpendicular del segmento lineal.
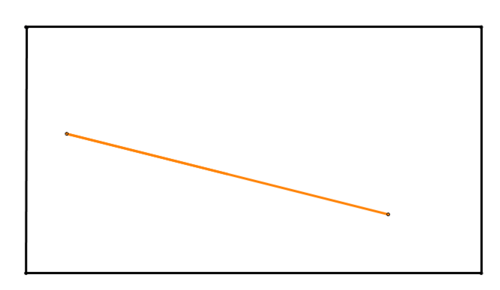 Figura\(\PageIndex{3}\)
Para encontrar la bisectriz perpendicular, dobla el papel para que los extremos queden uno encima del otro. Al hacer esto, has emparejado exactamente las dos mitades del segmento de línea.
Cualquier punto en el pliegue ahora es equidistante de ambos puntos finales, ¡porque los puntos finales están ahora en el mismo lugar! Esto significa que el pliegue realizado por el pliegue será la bisectriz perpendicular del segmento lineal.
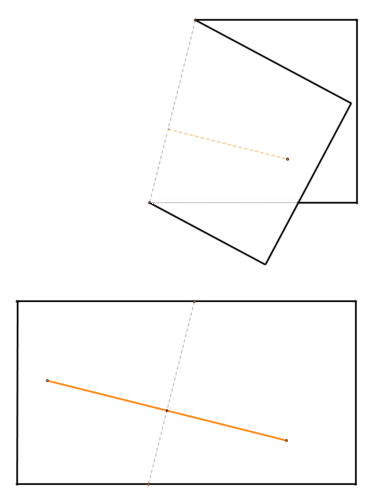 Figura\(\PageIndex{4}\)
2. Dibuja un segmento de línea como el naranja de abajo en una hoja de papel (el rectángulo de abajo representa el papel). Use una brújula y una recta para encontrar la bisectriz perpendicular del segmento de línea.
 Figura\(\PageIndex{5}\)
Usa tu brújula para dibujar un círculo centrado en cada punto final con el mismo radio. Asegúrate de que el radio de los círculos sea lo suficientemente grande como para que los círculos se crucen. Si los círculos son demasiado grandes para caber en el papel, dibuja la porción del círculo que cabe en el papel. Aquí está el primer círculo:
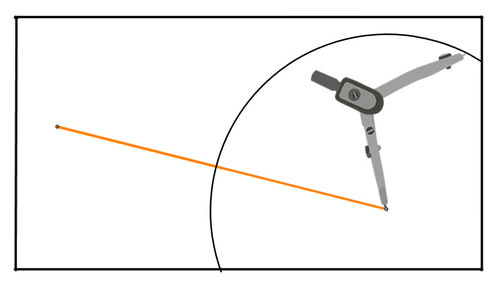 Figura\(\PageIndex{6}\)
Aquí está el segundo círculo:
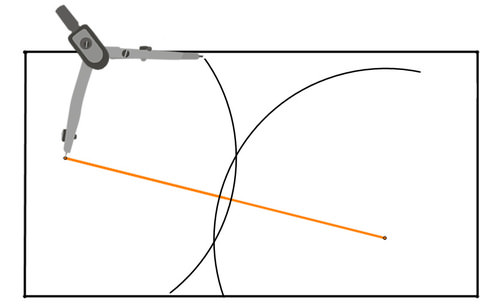 Figura\(\PageIndex{7}\)
Los puntos de interés son los dos puntos donde se cruzan los círculos. Debido a que el radio de cada círculo es el mismo, cada uno de estos puntos son equidistantes de los puntos finales del segmento de línea.
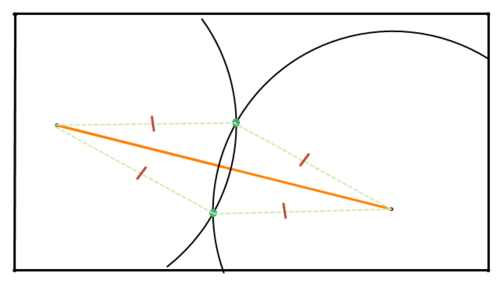 Figura\(\PageIndex{8}\)
Por lo tanto, cada uno de estos puntos se encuentra en la bisectriz perpendicular del segmento lineal. Usa tu recta para dibujar una línea que conecte los dos puntos de intersección. Esta es la bisectriz perpendicular del segmento lineal.
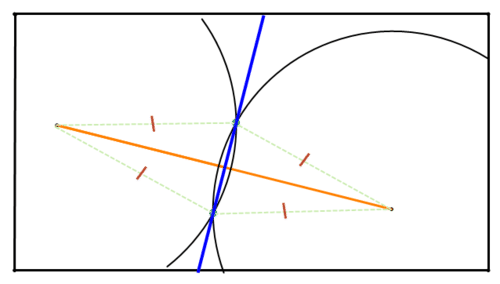 Figura\(\PageIndex{9}\)
¿Cómo se puede usar una brújula y una recta para encontrar el punto medio de un segmento de línea?
Una forma es utilizar el proceso del Ejemplo B para construir la bisectriz perpendicular. El punto medio del segmento de línea será el punto donde la bisectriz perpendicular intersecta el segmento de línea.
Ejemplo\(\PageIndex{1}\)
Anteriormente, se le preguntó cómo construir un\(45^{\circ}\) ángulo usando una brújula y una recta.
Una forma de construir un\(45^{\circ}\) ángulo es:
- Dibuja un segmento y construye su bisectriz perpendicular. Esto te dará\(90^{\circ}\) ángulos.
- Construir el ángulo bisectriz de uno de esos\(90^{\circ}\) ángulos. Esto producirá dos\(45^{\circ}\) ángulos. Nota: Los pasos para construir una bisectriz angular se exploran en las preguntas de práctica guiada.
¿Se te ocurre otra manera de construir un\(45^{\circ}\) ángulo perfecto con solo una brújula y una recta?
Ejemplo\(\PageIndex{2}\)
Dibuja un ángulo como el de abajo en una hoja de papel (el rectángulo de abajo representa el papel). Tenga en cuenta que los dos segmentos que crean el ángulo NO necesitan tener la misma longitud. Dobla el papel para crear la bisectriz del ángulo.
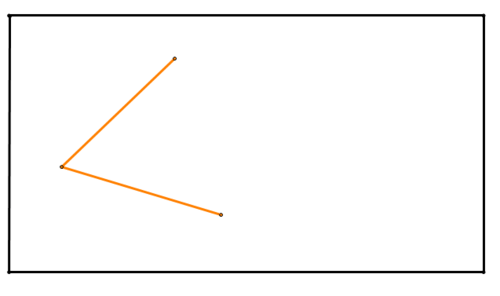 Figura\(\PageIndex{10}\)
Solución
Dobla el papel para que un segmento se superponga al otro segmento. El pliegue será el ángulo bisectriz.
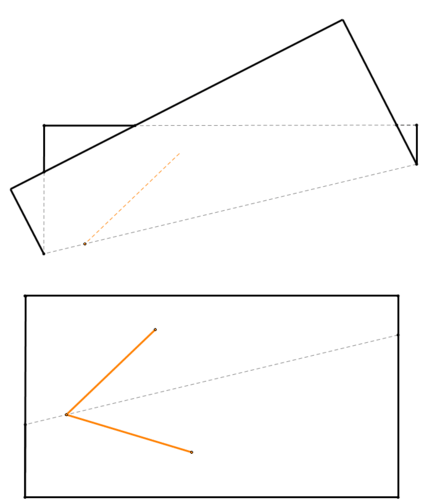 Figura\(\PageIndex{11}\)
Ejemplo\(\PageIndex{3}\)
Dibuja un ángulo como el de abajo en una hoja de papel (el rectángulo de abajo representa el papel). Tenga en cuenta que los dos segmentos que crean el ángulo NO necesitan tener la misma longitud. Usa una brújula y una recta para encontrar la bisectriz del ángulo.
 Figura\(\PageIndex{12}\)
Solución
Usa tu brújula para crear una porción de un círculo centrada en el vértice del ángulo que pasa a través de ambos segmentos creando el ángulo:
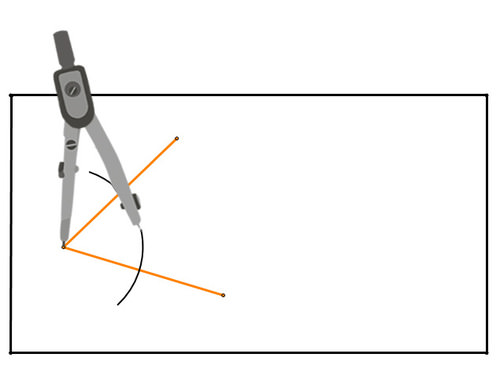 Figura\(\PageIndex{13}\)
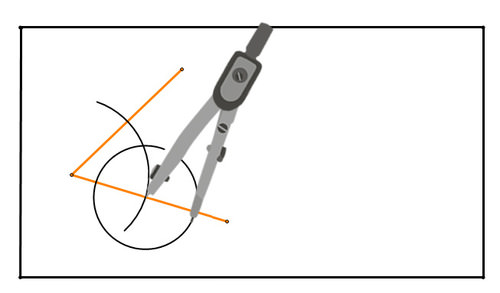 Figura\(\PageIndex{14}\)
Aquí está el segundo círculo:
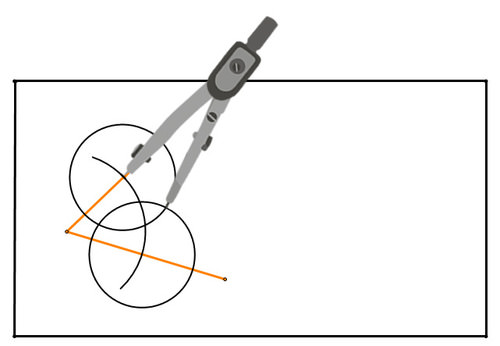 Figura\(\PageIndex{15}\)
Los puntos donde se cruzan los círculos son equidistantes de los segmentos que crean el ángulo. Por lo tanto, definen la bisectriz del ángulo. Conecte esos puntos de intersección para crear el ángulo bisectriz:
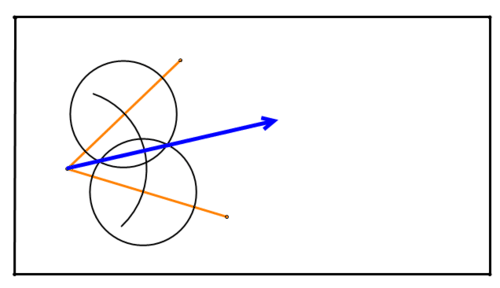 Figura\(\PageIndex{16}\)
Ejemplo\(\PageIndex{4}\)
Demostrar que el ángulo bisectriz creado usando el método en #2 es en realidad el ángulo bisectriz.
Considera la construcción del #2 a continuación. Los puntos han sido etiquetados y se han dibujado dos segmentos adicionales en (mostrados en verde):
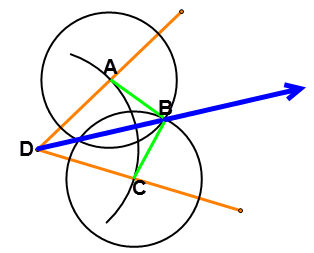 Figura\(\ PageIndex {17}\)
Solución
En esta imagen,\(\oveline{AD} \cong \overline{CD}\)because they are both radiuses of the same partial circle centered at point \(D\). \(\overline{AB} \cong \oveline{CB}\) because they are both radiuses of congruent circles centered at \(A\) and \(C\) respectively. \(\overline{BD} \cong \overline{BD}\) by the reflexive property. Therefore, \(\Delta ABD \cong \Delta CBD\) by \(SSS \cong\). \(\angle ADB \cong \angle BDC\) because they are corresponding parts of congruent triangles. Therefore, \(\overrightarrow{BD}\) must be the angle bisector of \(\angle ADC\).
Review
- What does it mean to bisect a segment or an angle?
- Describe the steps for finding the perpendicular bisector of a line segment.
- Describe how to use the perpendicular bisector of a line segment to find the midpoint of the line segment.
- What's the difference between a bisector and a perpendicular bisector? How can you construct a non-perpendicular bisector of a line segment?
- Draw a line segment on your paper and construct the perpendicular bisector of the segment.
- Draw another line segment on your paper and construct the perpendicular bisector of that segment using another method.
- Draw an angle on your paper and construct the bisector of the angle.
- Draw another angle on your paper and construct the bisector of that angle using another method.
- Use your straightedge to draw a triangle on your paper. Construct the angle bisector of each angle. What point have you found?
- Use your straightedge to draw a triangle on your paper. Construct the perpendicular bisector of each side of the triangle. What point have you found?
- Use the triangle and your work from #10. Construct the medians of the triangle. What point have you found?
- Compare and contrast the two methods for finding a bisector-paper folding vs. compass and straightedge.
- Construct a \(45^{\circ}\) angle (look at the concept problem for help). Then, construct a \(22.5^{\circ}\) angle.
- Construct an isosceles right triangle. Hint: Start by creating a right angle by constructing a perpendicular bisector.
- If possible, extend your construction of an isosceles right triangle to construct a square. Describe your steps.
Review (Answers)
To see the Review answers, open this PDF file and look for section 5.2.
Vocabulary
| Term | Definition |
|---|---|
| perpendicular bisector | A perpendicular bisector of a line segment passes through the midpoint of the line segment and intersects the line segment at \(90^{\circ}\). |
| Ray | A ray is a part of a line that has one endpoint and continues indefinitely in one direction. |
| Bisector | A bisector divides a line segment or angle into two congruent parts. |
Additional Resource
Interactive Element

